How to Create and Host a Python Telegram Bot on Code Capsules
This guide uses Python. You can find the Node.js version here, and the Go version here.
In this tutorial, we'll create a Telegram bot that will allow us to pull temperature, weather, and exchange rate data on the go by messaging our bot in the Telegram app.
We'll also learn how to host this bot on Code Capsules so it can be used by others. Along the way, we'll learn some key concepts about hosting bots securely and efficiently.
Requirements
To create a Telegram bot, we'll need:
- Python 3.9+ installed.
- A GitHub account and Git installed.
- Virtualenv installed.
- A Code Capsules account.
About Telegram Bots
Telegram bots appear as contacts on the Telegram interface. Users interact with Telegram bots by messaging them with commands – these are words preceded by a forward slash, such as /weather or /currency. Commands sent to the bot's account on Telegram are passed to the bot's backend code (in our case, this will be the code we host on Code Capsules).
For example, when we send the command /weather to our bot later in this article, the bot will reply with the weather data from our personal API.
Let's create a Telegram bot.
Registering a Bot Account and Talking to the BotFather
To create a Telegram bot, we need to download Telegram and create a user account. You can use Telegram on your PC, your phone, or both.
Once you have a Telegram account, you can register a new bot by sending a message to BotFather, a bot managed by Telegram itself. Search for BotFather and initiate a chat. From the chat interface, follow these steps:
- Click Start.
- Type
/newbot. - Choose a name for your bot.
- Choose a username for your bot (must end in
bot).
Once you've chosen a username, the BotFather will reply with an authorization token. This is a string that enables your bot to send requests to the Telegram Bot API. Make sure to save this token somewhere safe and private.
To check whether your bot was successfully created, search for the bot's username. You should see the bot and be able to start a conversation with it. Right now, your bot won't reply to anything you send it, as it doesn't have any backend code yet. Let's change that.
Planning and Setup
We're going to implement two commands for our bot.
- When we send the command
/weather, our bot will reply with the weather data from the weather API. - When we send the command
/currency, our bot will reply with the exchange rates for converting USD to CAD, EUR, and ZAR.
Creating a Virtual Environment and Installing Requirements
First, we need to create a local directory. Give it the same name as the bot. Then, from this directory, open a terminal and create a Python virtual environment by entering the following command:
python -m venv venv
Activate the virtual environment using the appropriate command for your system:
- Linux/macOS:
source venv/bin/activate - Windows:
venv\Scripts\activate.bat
The virtual environment will help manage our dependencies when we host the bot on Code Capsules.
To interact with the Telegram Bot API, we need to install the python-telegram-bot library, a Python wrapper for the Telegram Bot API. We'll also use the Python library requests to retrieve data from the weather and currency exchange rate API. Finally, we will install the python-dotenv library for convenience, so that we can store our sensitive API keys in a file while we test locally. To install these requirements, enter the following in your terminal:
pip install python-telegram-bot requests python-dotenv
Registering Accounts on OpenExchangeRates and Weatherstack
Our bot will return the current temperature of a chosen city and the USD exchange rates for three currencies. We'll create our response by combining data from two APIs: Weatherstack and OpenExchangeRates.
Getting Our API Keys
In the directory where we'll create our bot (the same directory where we activated our virtual environment), create a file called .env. We'll use this to store our API keys temporarily while we code and test.
First, let's register an account on OpenExchangeRates. Navigate to the site and:
- Sign up and log in.
- On the dashboard, click App IDs.
- Take note of your App ID (API key), and paste it in the
.envfile:EXCHANGE_API_KEY=<YOUR_API_KEY>.
Obtaining the Weatherstack API key is similar:
- Create a free account on Weatherstack
- Log in, copy the API key displayed in the control panel, and paste it into the
.envfile:WEATHER_API_KEY=<YOUR_API_KEY>.
At this point, we can also add the authorization token for the Telegram bot we created earlier to the .env file: BOT_TOKEN=<YOUR_BOT_TOKEN>.
Creating the Bot
Now we can start coding. Create a file named bot.py in the same directory as your .env file. We'll set up helper functions to fetch data from the weather and exchange rate APIs. In this file, enter the following code:
import os
import requests
from dotenv import load_dotenv

load_dotenv()

EXCHANGE_API_KEY = os.getenv('EXCHANGE_API_KEY')
WEATHER_API_KEY = os.getenv('WEATHER_API_KEY')

EXCHANGE_URL = f'https://openexchangerates.org/api/latest.json?app_id={EXCHANGE_API_KEY}'
EXCHANGE_PARAMS = {'symbols': 'ZAR,EUR,CAD'}

WEATHER_URL = f'http://api.weatherstack.com/current?access_key={WEATHER_API_KEY}'
WEATHER_PARAMS = {'query': 'Cape Town'}

def get_weather():
    response = requests.get(WEATHER_URL, params=WEATHER_PARAMS)
    curr_temp = response.json()['current']['temperature']
    return f'Hello. The current temperature in Cape Town is: {curr_temp} celsius.'

def get_exchange_rates():
    response = requests.get(EXCHANGE_URL, params=EXCHANGE_PARAMS)
    rates = response.json()['rates']
    cad_rate, eur_rate, zar_rate = rates['CAD'], rates['EUR'], rates['ZAR']
    return f'Hello. Today, USD conversion rates are as follows: USD->CAD = {cad_rate}, USD->EUR = {eur_rate}, USD->ZAR = {zar_rate}'
We've created two helper functions: get_weather() and get_exchange_rates(). These functions make requests to the third-party APIs and then format the JSON response into a string that the bot can send back to users. The load_dotenv() call above loads the variables from our .env as environment variables.
Creating the Bot
Now we can get to creating the actual bot. At the top of the bot.py file, add this line:
from telegram.ext import Application, CommandHandler
From the python-telegram-bot library, we import two classes: Application and CommandHandler. Now we can create our main() method like this:
def main():
    TOKEN = os.getenv('BOT_TOKEN')
    application = Application.builder().token(TOKEN).build()

    weather_handler = CommandHandler("weather", weather)
    currency_handler = CommandHandler("currency", currency)
    start_handler = CommandHandler("start", start)

    application.add_handler(weather_handler)
    application.add_handler(currency_handler)
    application.add_handler(start_handler)

    application.run_polling()

if __name__ == '__main__':
    main()
At the top of our new main method, which will be called when this file is run, we instantiate application, an instance of the Telegram library's Application class. This object will retrieve commands sent to our bot and handle them using the appropriate handlers we define.
Next, we create three different CommandHandler classes, one for each command that can be sent to our bot: /start, /weather, and /currency. We pass two arguments into each instantiation: the command text (without the preceding /) and a function to call. For example, when a user enters the command /weather, the weather() function will be called.
Let's define these functions. Just above def main(), enter the following three function definitions:
async def weather(update, context):
    await context.bot.send_message(chat_id=update.effective_chat.id, text=get_weather())

async def currency(update, context):
    await context.bot.send_message(chat_id=update.effective_chat.id, text=get_exchange_rates())

async def start(update, context):
    await context.bot.send_message(chat_id=update.effective_chat.id, text="Hi! I respond to /weather and /currency. Try them!")
Each function calls the python-telegram-bot function send_message() with the ID of the current chat and the appropriate text, either returned from one of our other functions or specified as a string. Note that these functions are now async and use await when calling bot methods - this is required in the newer version of the library. The update and context arguments are supplied automatically by the application.
Back in our main() function, we use application.add_handler to add all three handlers to our application.
Finally, application.run_polling() will begin polling for updates from Telegram. This means our code will regularly ask Telegram's servers whether any commands have been sent to it. Upon receiving commands, the appropriate handler will be invoked.
The code bot.py file should now look like the code below. Make sure you add your API keys to the .env file in the same directory.
import os
import requests
from telegram.ext import Application, CommandHandler
from dotenv import load_dotenv

load_dotenv()

EXCHANGE_API_KEY = os.getenv('EXCHANGE_API_KEY')
WEATHER_API_KEY = os.getenv('WEATHER_API_KEY')

EXCHANGE_URL = f'https://openexchangerates.org/api/latest.json?app_id={EXCHANGE_API_KEY}'
EXCHANGE_PARAMS = {'symbols': 'ZAR,EUR,CAD'}

WEATHER_URL = f'http://api.weatherstack.com/current?access_key={WEATHER_API_KEY}'
WEATHER_PARAMS = {'query': 'Cape Town'}


def get_weather():
    """Fetch current weather from external API"""
    response = requests.get(WEATHER_URL, params=WEATHER_PARAMS)
    curr_temp = response.json()['current']['temperature']
    return f'Hello. The current temperature in Cape Town is: {curr_temp} celsius.'


def get_exchange_rates():
    """Fetch exchange rates from external API"""
    response = requests.get(EXCHANGE_URL, params=EXCHANGE_PARAMS)
    rates = response.json()['rates']
    cad_rate, eur_rate, zar_rate = rates['CAD'], rates['EUR'], rates['ZAR']
    return f'Hello. Today, USD conversion rates are as follows: USD->CAD = {cad_rate}, USD->EUR = {eur_rate}, USD->ZAR = {zar_rate}'


async def weather(update, context):
    await context.bot.send_message(chat_id=update.effective_chat.id, text=get_weather())


async def currency(update, context):
    await context.bot.send_message(chat_id=update.effective_chat.id, text=get_exchange_rates())


async def start(update, context):
    await context.bot.send_message(chat_id=update.effective_chat.id, text='Hi! I respond to /weather and /currency. Try them!')


def main():
    TOKEN = os.getenv('BOT_TOKEN')
    application = Application.builder().token(TOKEN).build()

    weather_handler = CommandHandler('weather', weather)
    currency_handler = CommandHandler('currency', currency)
    start_handler = CommandHandler('start', start)

    application.add_handler(weather_handler)
    application.add_handler(currency_handler)
    application.add_handler(start_handler)

    application.run_polling()


if __name__ == '__main__':
    main()
Below is a conversation with a bot created using this program. Run bot.py and try it out yourself.
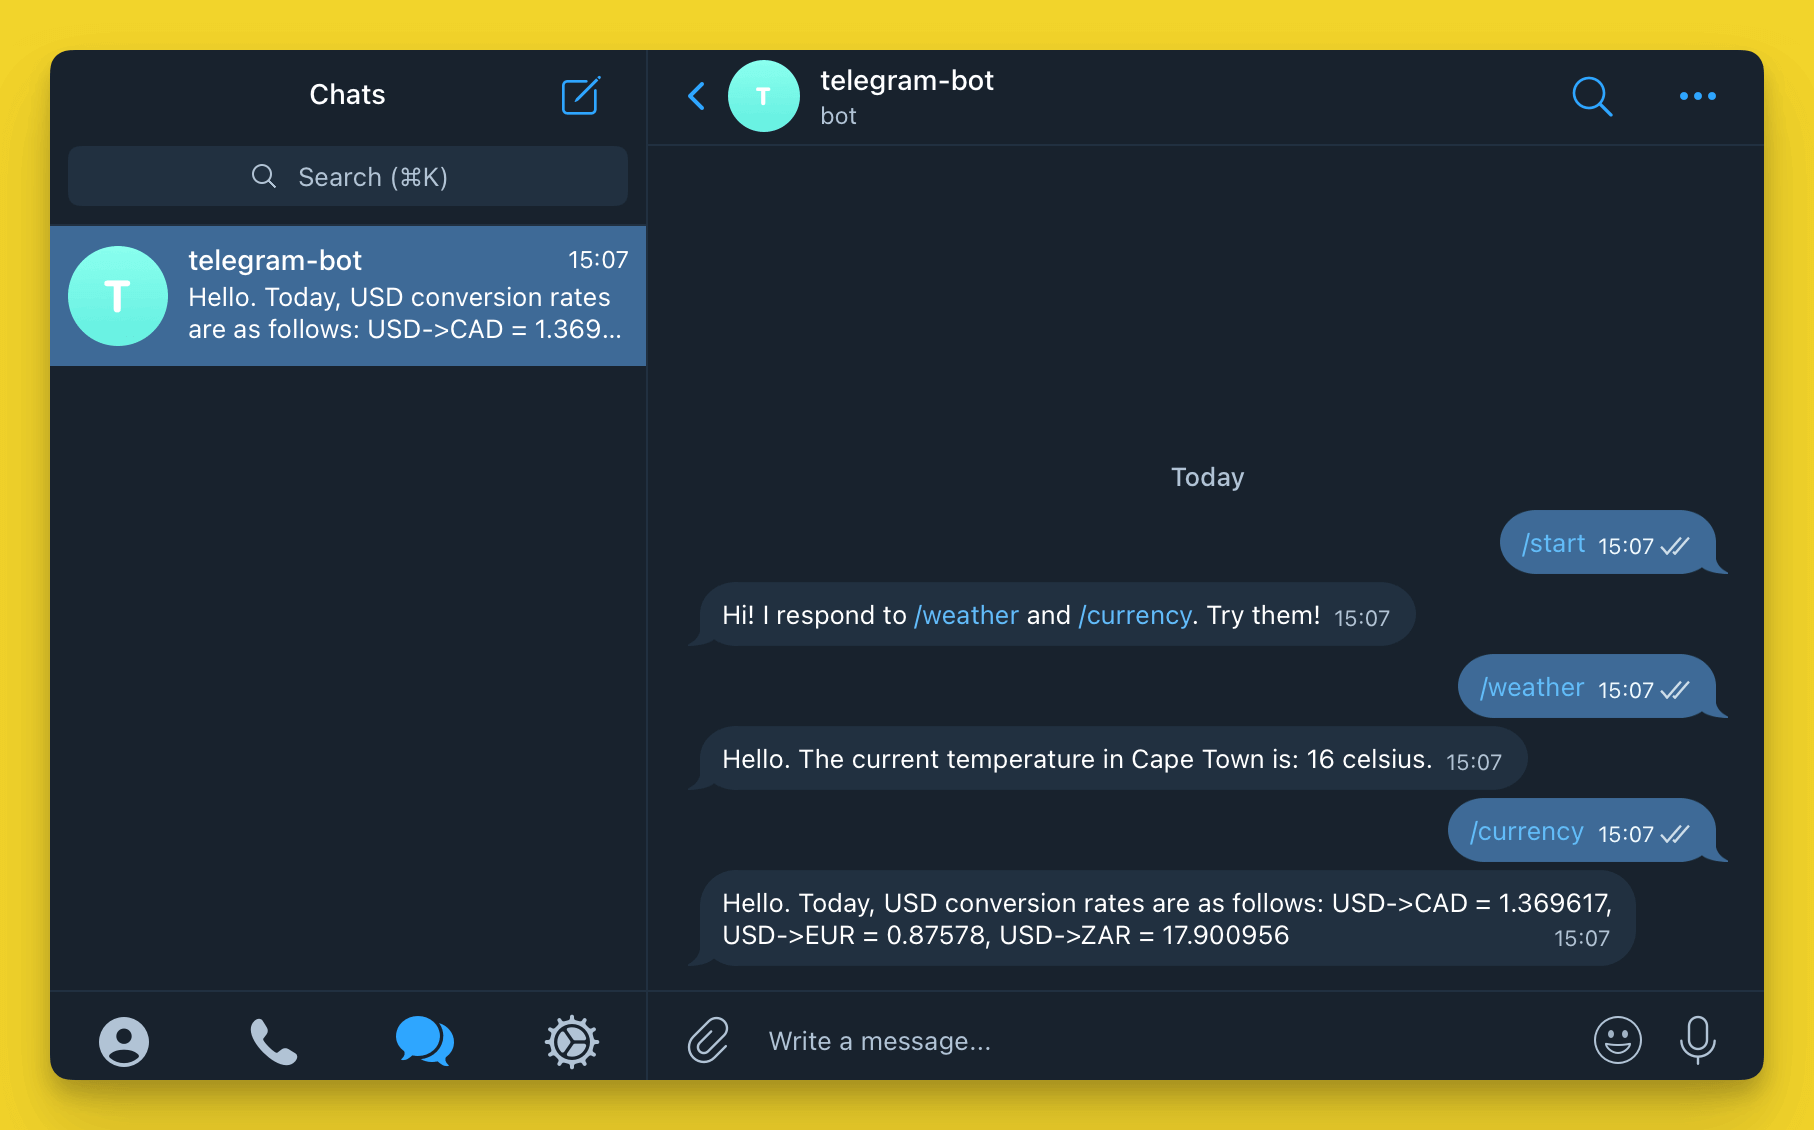
We won't be able to send messages to our bot if this program isn't running, so hosting it on Code Capsules will allow us to interact with the bot without having to keep this code permanently running on our development PC.
While we could deploy our bot to Code Capsules in its current state, there is a downside to our current implementation that we should remedy first.
Polling Versus Webhooks
There are two ways for our bot.py file to receive commands that have been sent to it on Telegram. Currently, the code polls Telegram constantly, regardless of whether the bot is in use. If we hosted this current version on Code Capsules, we would waste bandwidth, because the vast majority of polls would return nothing.
Instead of polling Telegram for changes, we can create a webhook. This will allow us to receive commands as they are sent by Telegram users, without having to continuously ask Telegram servers for them.
We'll set up a webhook by telling Telegram to send commands sent to our bot account to our bot's Code Capsules URL. Our application will then process the command using the appropriate handler and send back the requested information.
Creating a Webhook
To set up the webhook, replace the line application.run_polling() in the main function with the following code:
    PORT = int(os.environ.get('PORT', '443'))
    HOOK_URL = f"https://{os.getenv('APP_URL')}/{TOKEN}"
    application.run_webhook(listen='0.0.0.0', port=PORT, url_path=TOKEN, webhook_url=HOOK_URL)
The APP_URL environment variable will be automatically set when the Capsule finishes building on Code Capsules.
And install Telegram webhooks:
pip install "python-telegram-bot[webhooks]"
Here we start a webhook that will listen on our Code Capsules URL at TCP port 443 and with the path of our token. Thus, Telegram will relay commands sent to our bot to the following URL:
https://YOUR-CAPSULE-PUBLIC-URL/TOKEN
If you've completed some of our other backend tutorials, you will be familiar with setting up web servers that receive GET and POST requests to different routes. You can think of a webhook as a very simple HTTP server that is intended to be used by bots and automated services rather than humans.
Preparing for Deployment
Before we push our code to GitHub and deploy it on Code Capsules, we need to create some files.
Creating a Procfile and requirements.txt
Code Capsules requires a couple of files to deploy our application: Procfile and requirements.txt. The first one tells Code Capsules how to run our application, and the second one tells it which libraries it needs to install.
To create the Procfile:
- Navigate to the directory containing the
bot.pyfile and activate the virtual environment. - Create a file named
Procfile(with no file extension). - Open
Procfile, enterweb: python3 bot.py, and save the file.
In the same directory, open a terminal and activate the virtual environment. Then enter pip3 freeze > requirements.txt to generate a list of requirements for our Code Capsules server.
Now we can push our code to GitHub. Create a GitHub repository, then commit and push the requirements.txt, Procfile, and bot.py files to the repository. Make sure not to include the virtual environment files and the .env file, because these contain your sensitive keys. You can do so by creating a .gitignore file with the following contents:
venv/
.env
Deploying the Bot to Code Capsules
With all of the necessary files pushed to GitHub, let's deploy the bot to Code Capsules. Log in to Code Capsules and create a Team and Space as necessary.
- Click the add Capsule + button in your space.
- Choose Backend for the Capsule type, select your Team, and Space if not already populated.
- Choose your payment plan and click Next.
- Click the Configure Git for Code Capsules button and give access to the repository you created for the bot.
- Click Next.
- Leave the Run Command blank.
- Click Create Capsule.
We still need to create environment variables for our bot's authorization and API tokens. To create the environment variables:
- Navigate to your Capsule.
- Click the Config tab.
- Add environment variables in the same form as our
.envfile. Add three environment variables:BOT_TOKEN,WEATHER_API_KEY, andEXCHANGE_API_KEY.
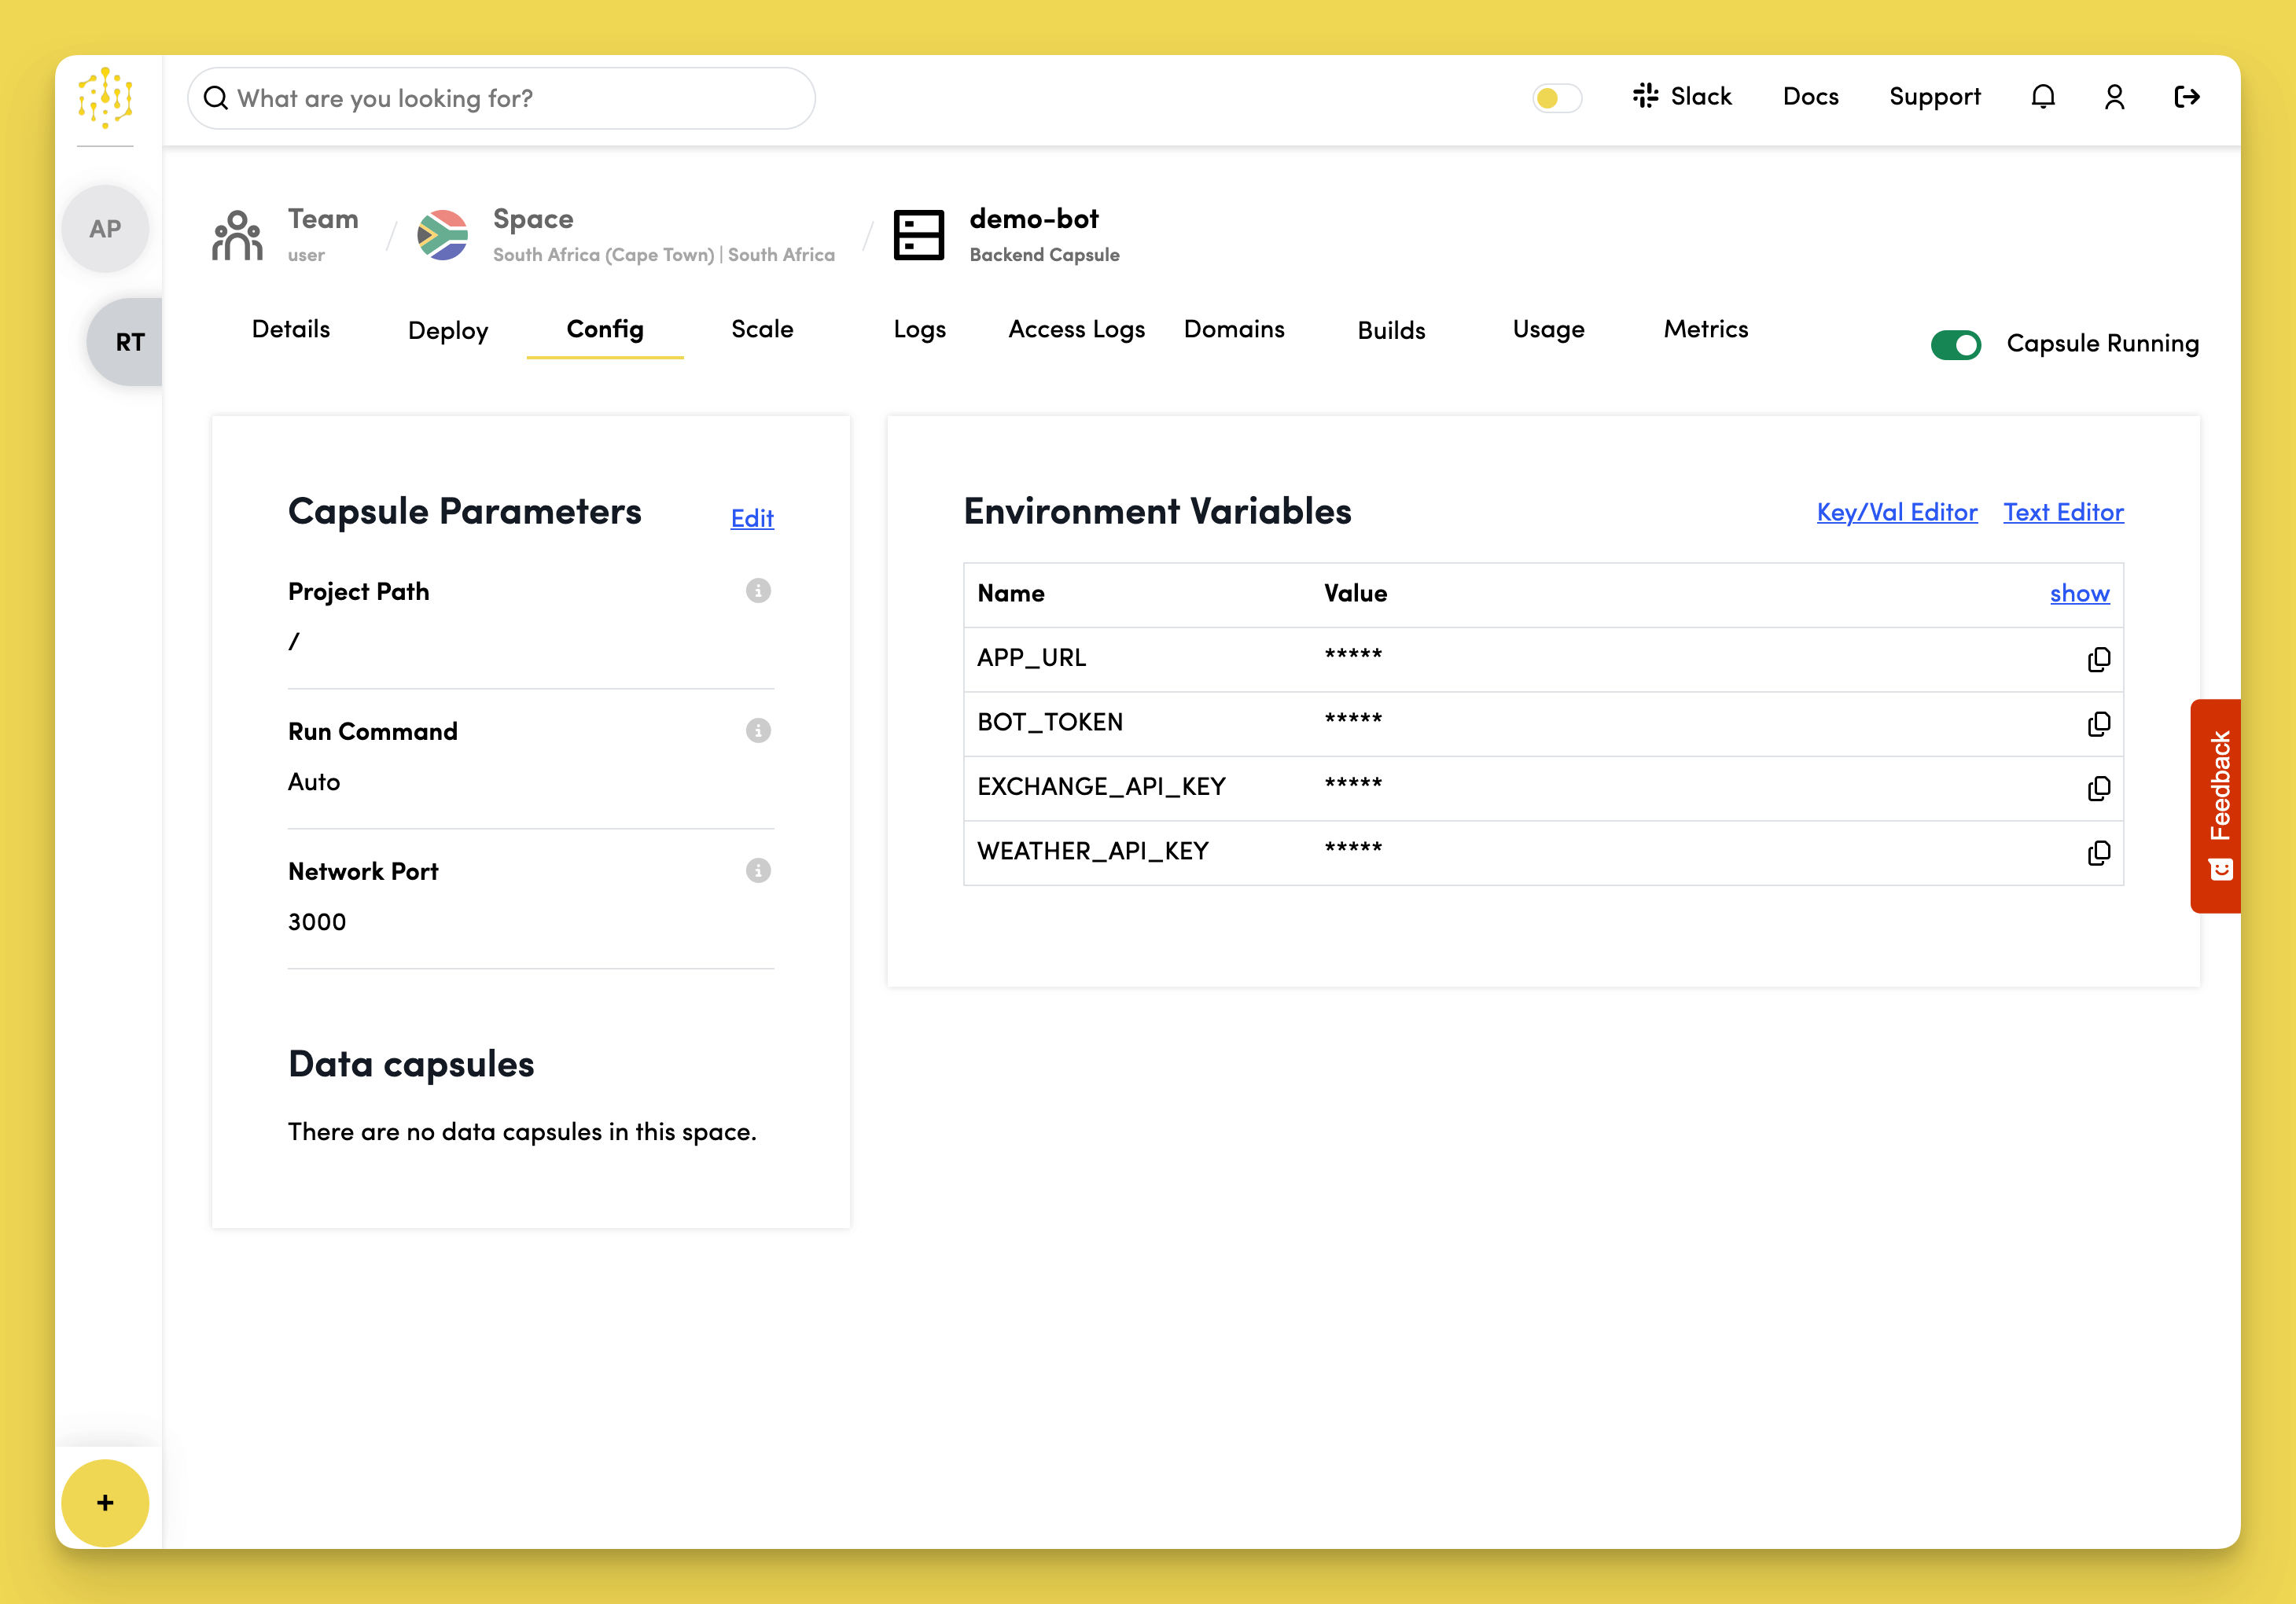
Once this is done, the Capsule will restart and the bot is ready. Give it a try!
Further Reading
We've covered a lot above, from creating a Telegram bot to the differences between webhooks and polling.
If you're interested in learning more about what you can do with Telegram bots, check out Telegram's bot developer introduction. If you have some ideas but require a deeper understanding of the python-telegram-bot library, browse their GitHub repository.
You can find a thorough explanation of webhooks in this blog post.