How to Migrate from Heroku to Code Capsules
This guide demonstrates how to move a suite of applications running on the Heroku platform as a service (PaaS) to Code Capsules.
Code Capsules lets you deploy frontends, backends, and databases from a single dashboard, with built-in GitHub integration and support for most popular frameworks including Node.js, Python, and Docker.
The guide walks you through the Code Capsules equivalents of Heroku components, how to change your connection settings to work on Code Capsules, how to export and restore your database, and common pitfalls to avoid.
Heroku is no longer adding new features as its parent company focuses on AI business opportunities. If you're considering moving your Heroku app to another PaaS, consider the benefits of Code Capsules.
Even if you don't intend to move to Code Capsules, this guide should help you create a general migration plan for most similar providers.
- How to Migrate from Heroku to Code Capsules
Document Your Heroku System
Before moving your app, you first need to document all of its components and settings:
- Using either the Heroku CLI or web interface, list all the apps you want to migrate.
- Check each app's Resources tab (or
Procfilein your repository) to see whether the dyno isweb, which has a public URL, orworker, which is for backend tasks only. Note whether the dyno is a standard framework (like Python) or a custom Docker image, and note how much CPU, RAM, and disk space it uses. - List all addons for each app, like databases and schedulers, and their connection settings.
- Note the exact URLs, domains, and subdomains of each app and addon.
- Copy the settings (config vars) into a spreadsheet.
- Examine the deployment process of each app. If you are migrating to Code Capsules, deployment is done by pushing to a Git hosting provider. Organize your repositories so that each app and version (QA, production) are in their own branch, or subfolder in a branch. This allows each to be deployed separately.
If your database is large, it may be the most complicated component to migrate. The simplest solution is to take your entire system offline, so that no new data is added. Then, back up your database from Heroku and restore it to your new host.
If you don't want to take your app offline, you need to use the dual-write method, which works roughly as follows:
- Create a database on your new host. Deploy your applications to the new host as well.
- Back up and restore static tables (enumerations) to the new database. These tables won't change, so you can migrate them in advance.
- Point your new application to the database on the old host, but write new data to both databases — new and old. This allows you to migrate gradually to the new host. Eventually you'll be able to point all applications to the database on the new host and take the old database offline.
There are a lot of edge cases and reconciliation problems with dual-writing. Consult a dedicated guide for more details.
An Example Full-Stack Application
Let's look at the most common type of application hosted on Heroku: a full-stack web application.
Full-stack web apps need a system comprised of the following components:

- A static web server to serve the website (or a dynamic host in something like PHP or Node.js)
- A backend web service that the website talks to
- A database, where the web service stores user data
- Another backend service, such as a cron job (scheduled task) that processes database data, an analytics service, or an email server
In Heroku, each of these components runs in a separate "dyno" (container).
Other common components include:
- Object storage, for storing images
- QA versions of the live components
- A message queue, like RabbitMQ
- An in-memory cache, like Redis
Reviewing the App on Heroku
Let's work through moving our example app from Heroku to Code Capsules. We'll first discuss the components on Heroku, so you'll understand the specifics when planning your migration to another provider.
The Frontend
On Heroku, you can create an app without assigning any dyno resources or deploying code yet. It acts as a placeholder. The dyno is created and run after you deploy your code, via a Procfile file. This file might have an instruction like web: node server.ts, which tells Heroku to run a new web dyno.
All our code was in TypeScript and Node.js. Heroku supports similar features in other languages.
Heroku doesn't support static websites. This was previously possible using a custom "buildpack", heroku-buildpack-static, but that's now deprecated. Instead, our example frontend dyno uses a Node.js static server — http-server.
Heroku has multiple ways to deploy code to a dyno. Identify which method your app uses:
- API (HTTP calls): The simplest solution. Just zip your code and use
curlto send the file to Heroku. - CLI: By downloading and running the Heroku CLI in your terminal, you can deploy your app to Heroku in three ways:
- By zipping and pushing a build (same as the API)
- By using the CLI to add Heroku as a Git remote server to your app's local Git repository, you can
git pushto that remote and Heroku will deploy it. - By building your own Docker image and pushing it to the Heroku Registry. You lose the PaaS benefits of automated security patching and runtime optimization.
- GitHub: Set Heroku to pull from your repository when you push to GitHub. (GitLab, Bitbucket, and Codeberg are not supported.)
For the frontend to work correctly, you need to set a backend URL, so the website knows where to talk to the web service. In Heroku, there are two ways to do this:
- You can set the values you need as config vars in your dyno's Settings tab. The values will appear as environment variables at runtime. For example, in Node.js you could then access
process.env.DATABASE_URL. - You can add the settings you need to a
.envfile along with your deployed code, and access them in the same way you would access a Heroku config var.
If you need to change a variable in any way before using it, you can add a postbuild step in your package.json file. For example, the following package file copies the backend URL to a JavaScript file that is included directly in the static HTML page:
"scripts": {
    "heroku-postbuild": ". ./.env && echo \"const backendUrl = '${BACKEND_URL}';\" > config.js",
    "start": "http-server . -p $PORT"
  },
The Backend
We needed to add our frontend app URL as a setting for the backend, so that we would not get CORS security errors when the two components talk to each other. Note that you need to deploy both frontend and backend to get both their URLs and set both environment variables before a system will work. You cannot deploy one component completely before the other.
The main difference with the backend is that it has access to the database. In Heroku, a database is not managed as an independent application. Instead, a database is an "addon" to the backend app, but other apps can be given access if necessary. You can create a PostgreSQL database in Heroku by adding it as an addon in the Resources tab of an app.
The database connection URL is automatically saved as a config var in the associated app, so your code can use the connection details as an environment variable. Since our application had only a single user table with only two columns, we created it in the backend code, without needing to run SQL scripts.
If you need to run database scripts or query data, Heroku exposes your database publicly. You can use a command like the one below to connect to the database. It shows our backend successfully saved the user's email address and plaintext password when registering on the site.
Warning: Storing passwords in plaintext is done here only for demonstration purposes. In a real application, always hash passwords using a library like bcrypt before storing them in your database.
psql "$(curl -s https://api.heroku.com/apps/migrate-backend/config-vars -H "Authorization: Bearer $KEY" -H "Accept: application/vnd.heroku+json; version=3"| jq -r '.DATABASE_URL')" -c 'SELECT * FROM "user"'

username | password
----------+----------
 t@t.com  | t

(1 row)
The Cron Job
Deploying a cron job is almost identical to deploying the backend in Heroku, with three differences:
- You need to specify the dyno type as a
workernot aweb. - You need to attach the app to the existing database addon, instead of creating a new one.
- You need to add a scheduler addon to the app.
The scheduler addon is like a cron manager — it specifies when your app should run. Other than these times, the app isn't running, saving money. For our example scheduler, we set it to run the command node job.ts every hour. The script this command runs connects to the database and prints every user — to mimic sending a welcome email or extracting analytics information.
You can see what that looks like below:
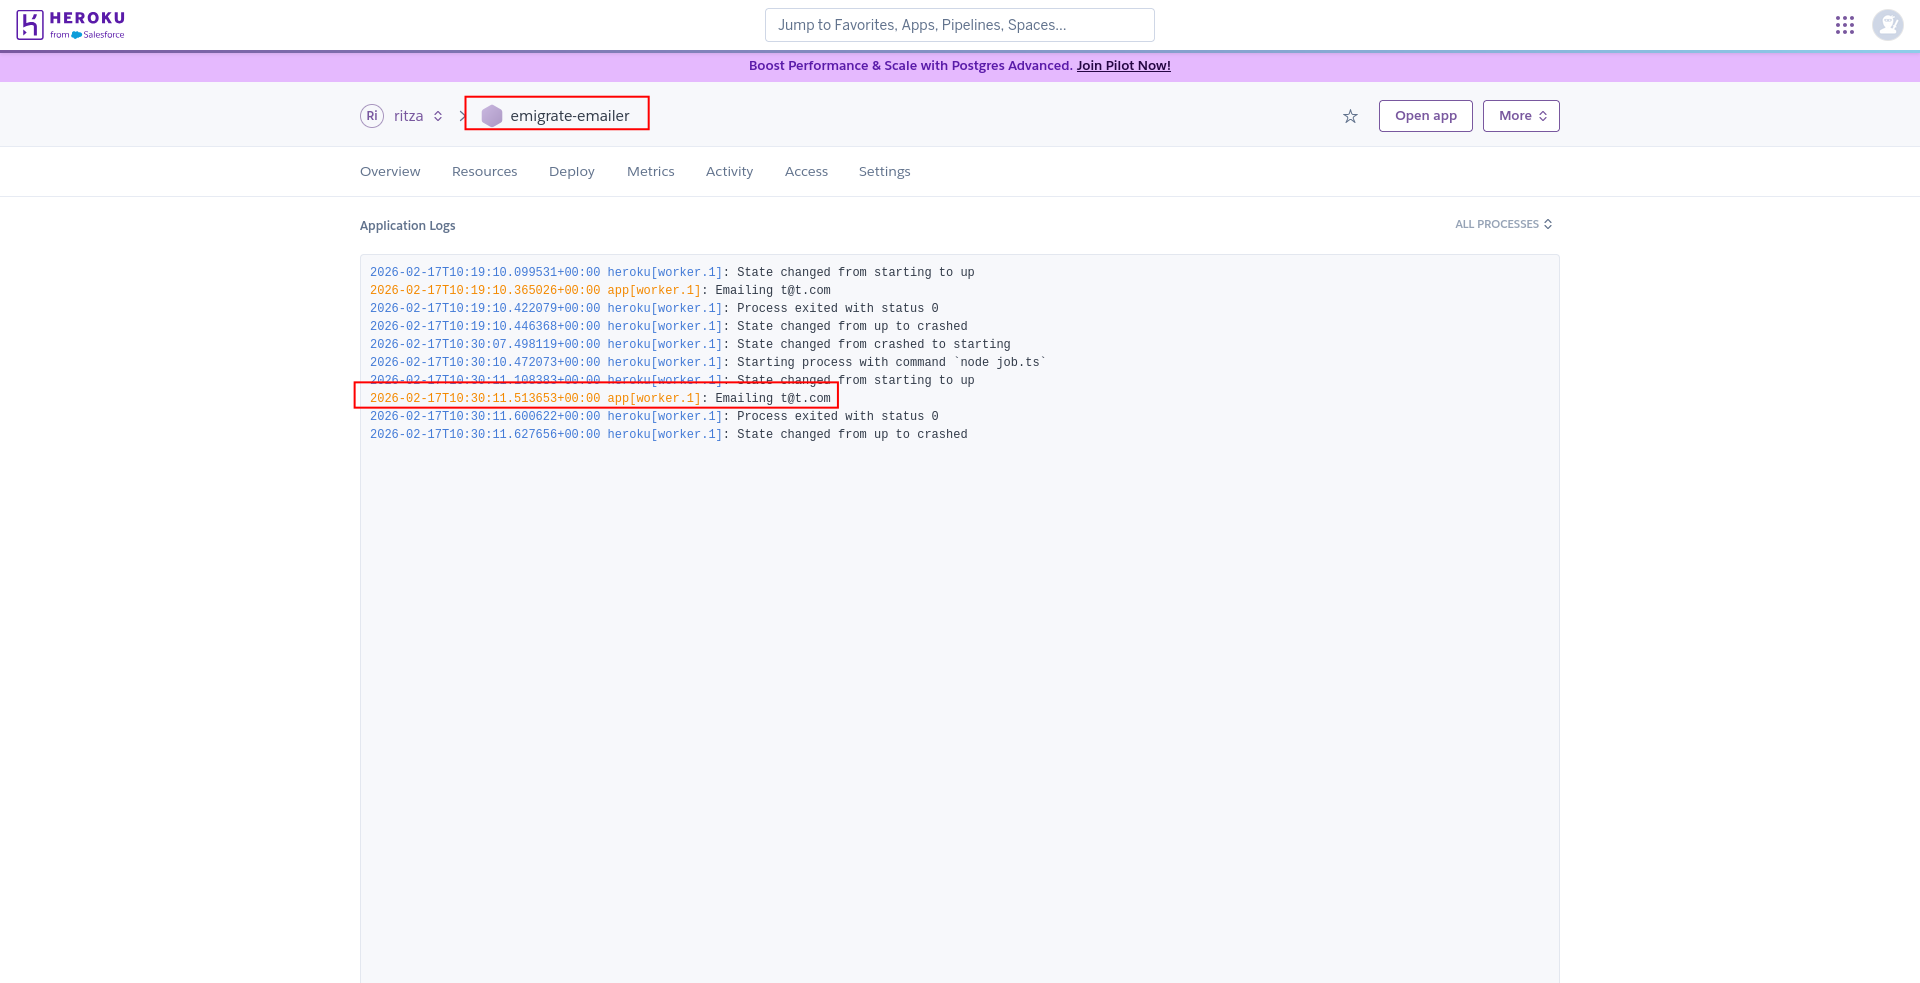
Summary of the System
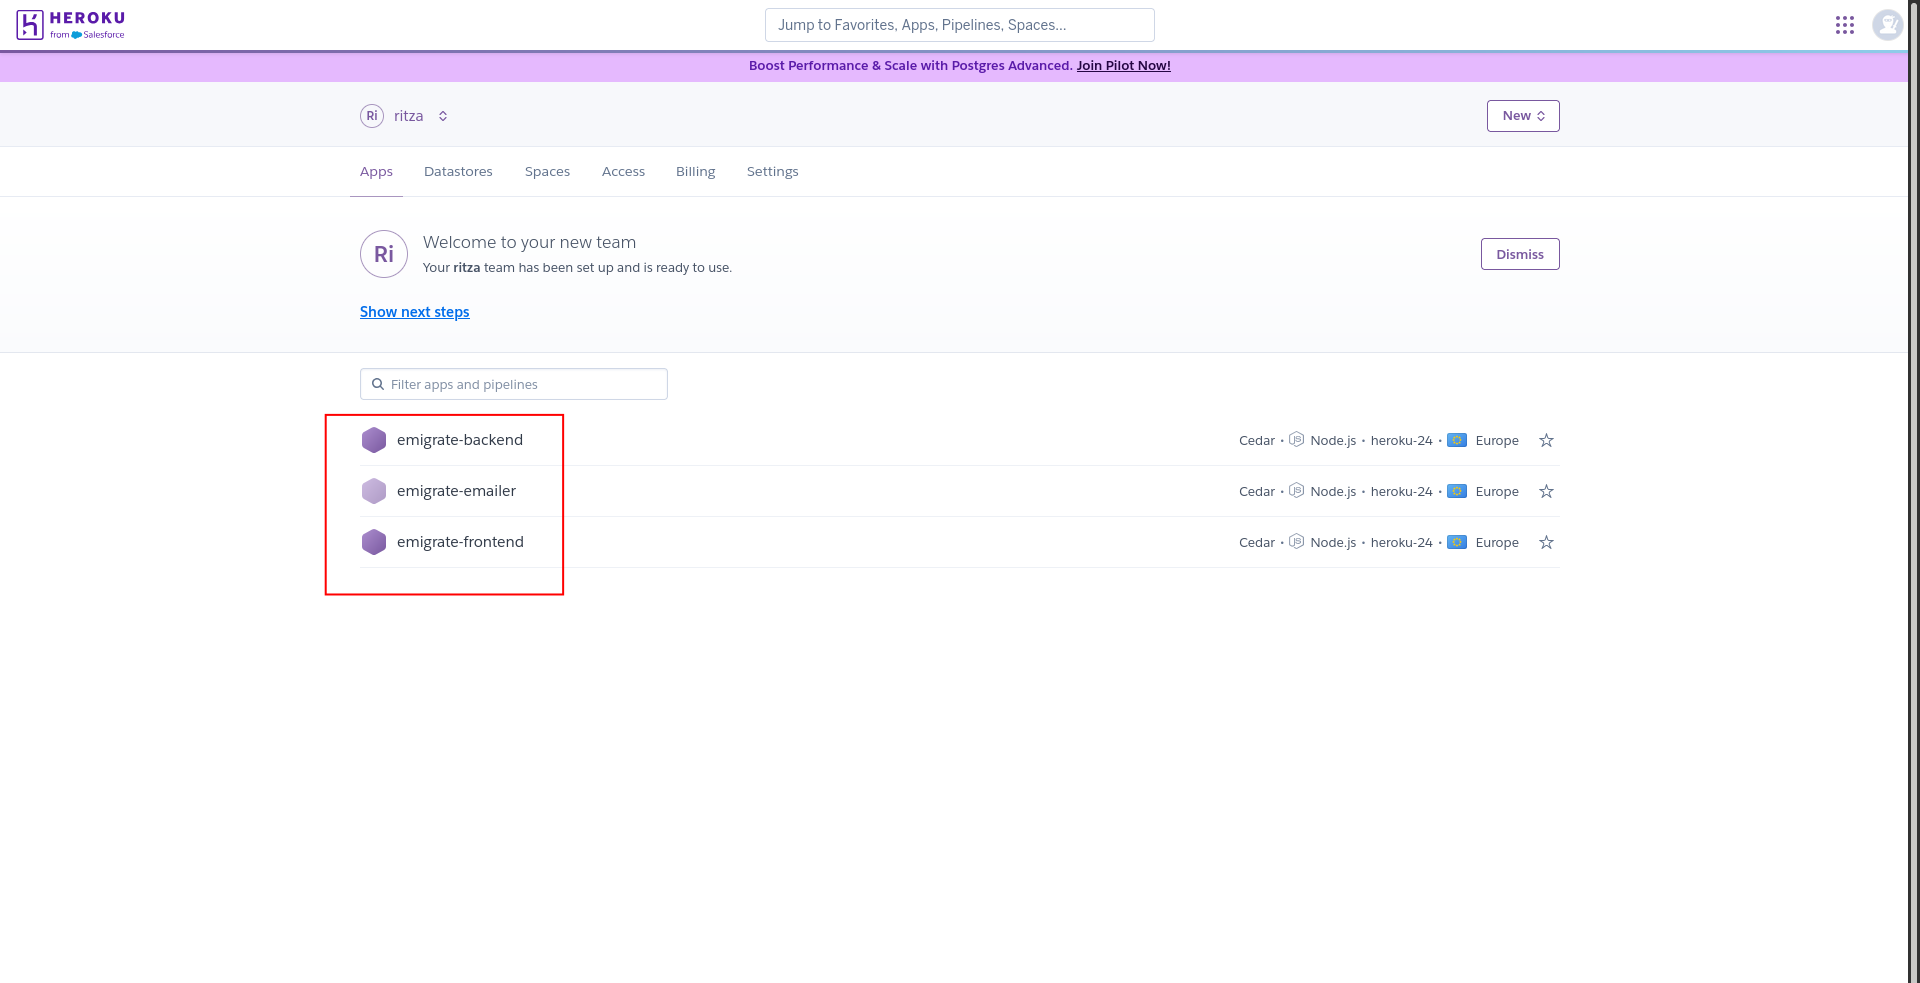
Our example Heroku system consists of three apps, shown below, with one database addon and one scheduler addon.
Creating the App on Code Capsules
In this section you'll learn how to deploy the app (and data) we created in Heroku on Code Capsules.
First we create a Code Capsules Space. Rather than the Heroku way of grouping applications by a globally unique name, Code Capsules allows you to group all components of an application inside a Space. We'll call our space migrate.
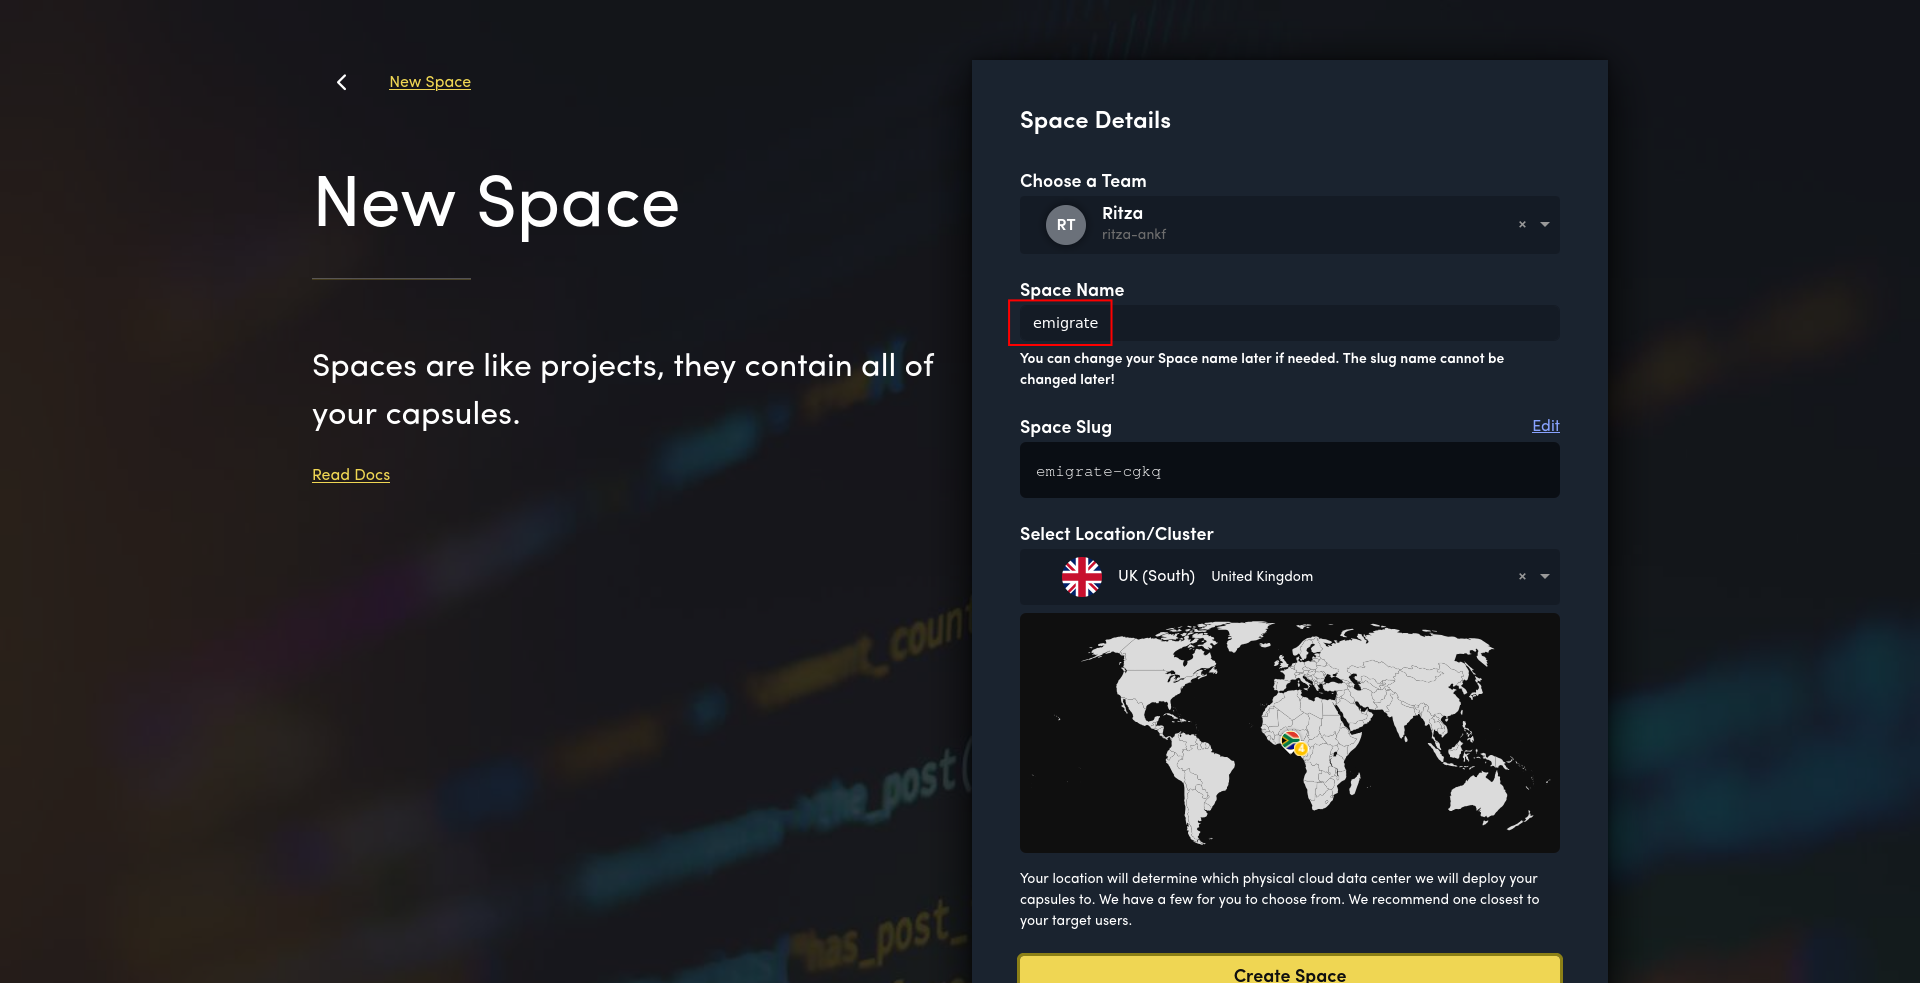
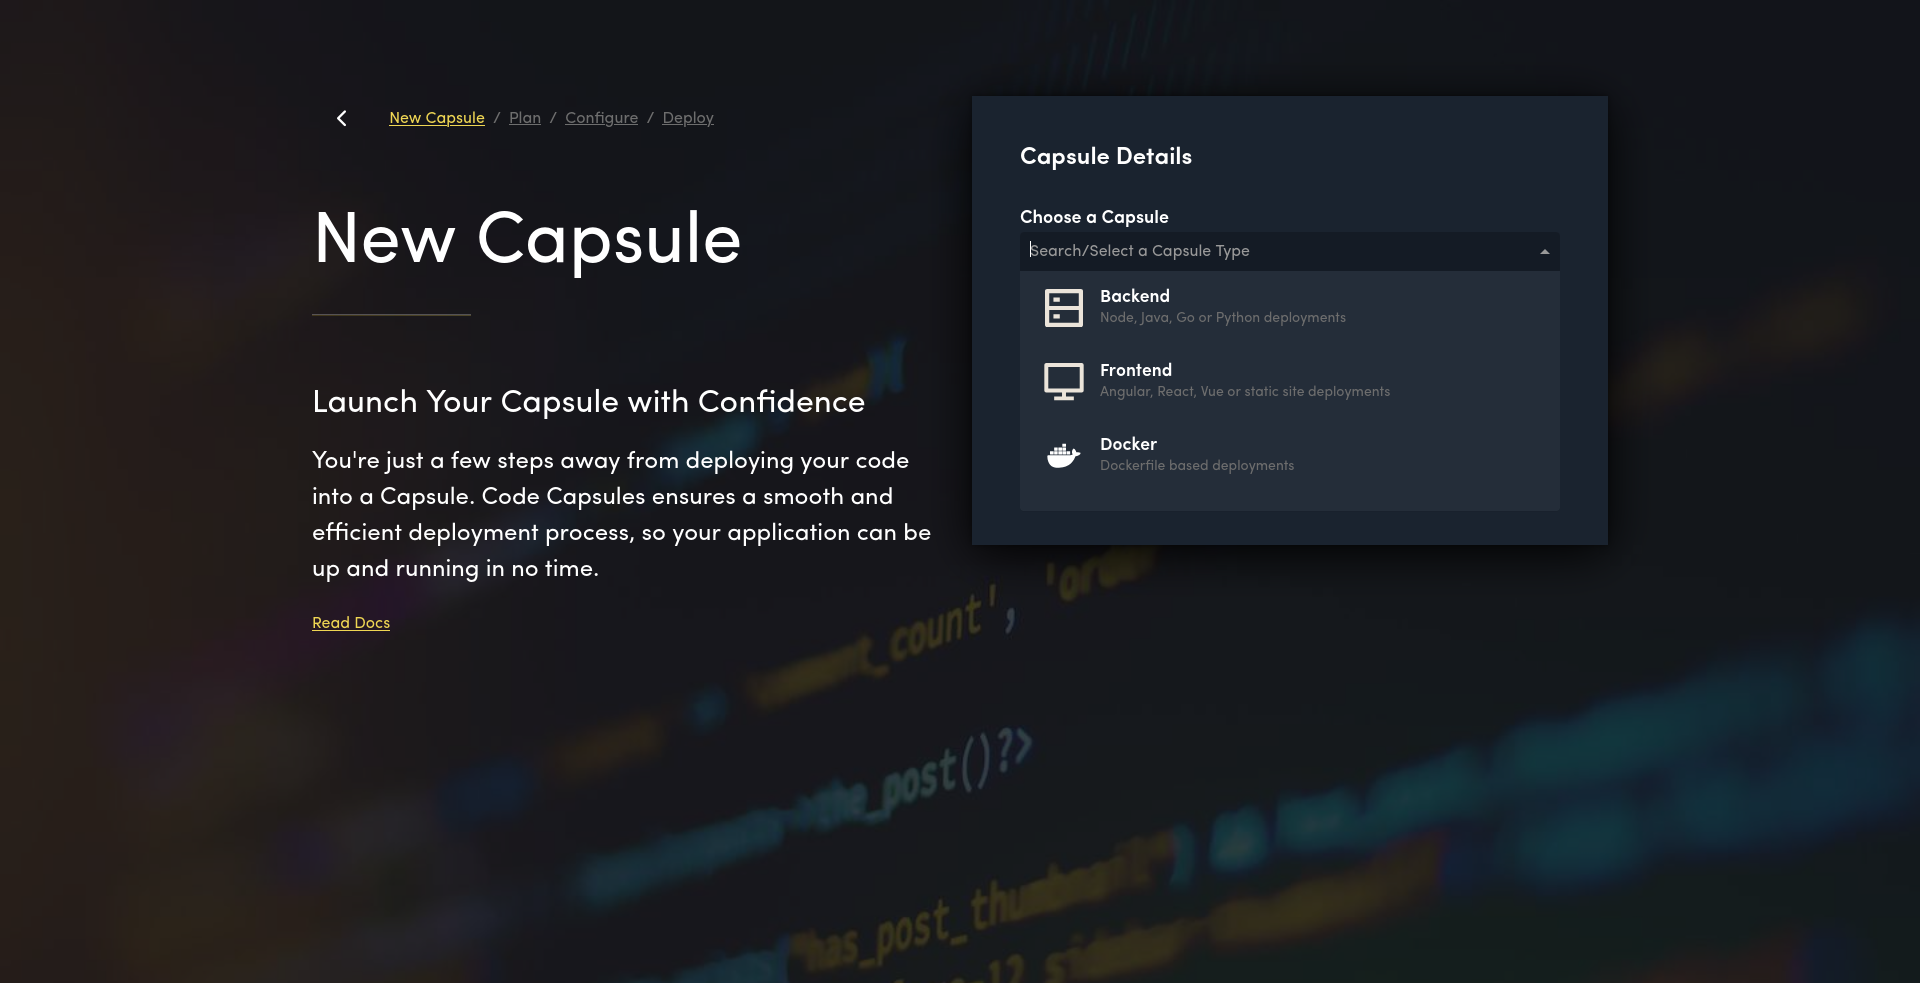
Next, create a new Capsule for each component you have in Heroku. From your Space, click the yellow + icon at the bottom left of the screen to create a new Capsule. Select a Capsule type and follow the prompts provided. Note that a frontend Capsule can serve any JavaScript framework, not just the ones shown in the Quickstart tab.
Below is a mapping of the Heroku components to Code Capsules Capsules:
| Component | Heroku | Code Capsules |
|---|---|---|
| migrate-db | An addon attached to migrate-backend | PostgreSQL Capsule |
| migrate-backend | Node.js Dyno | Backend Node.js Capsule |
| migrate-frontend | Node.js Dyno | Frontend Node.js or static site Capsule |
| migrate-emailer | Node.js worker Dyno, using Heroku Scheduler addon | Backend Node.js Capsule with internal scheduling |
The table below shows a rough monthly cost comparison for this example app, using the smallest always-on tier for each component. Actual costs depend on your usage and configuration. See Code Capsules pricing and Heroku pricing for current details.
| Component | Heroku | Code Capsules |
|---|---|---|
| PostgreSQL | $5/mo (Essential-0, 1 GB) | From $8/mo (PostgreSQL Capsule, custom, 1 GB) |
| Backend | $7/mo (Basic dyno) | From $7.50/mo (Backend Capsule, custom) |
| Frontend | $7/mo (Basic dyno) | From $3/mo (Frontend Capsule) |
| Cron Worker | $7/mo (Basic dyno) | From $7.50/mo (Backend Capsule, custom) |
| Scheduler | Free (addon) | Included (in-app) |
| Total | ~$26/mo | ~$26/mo |
Heroku has cheaper 'Eco dynos' at $5/mo, but they sleep after 30 minutes of inactivity, which is unsuitable for production.
If you don't see the appropriate Capsule type at first, search for it by name or use the hidden scrollbar to find it in the dropdown.
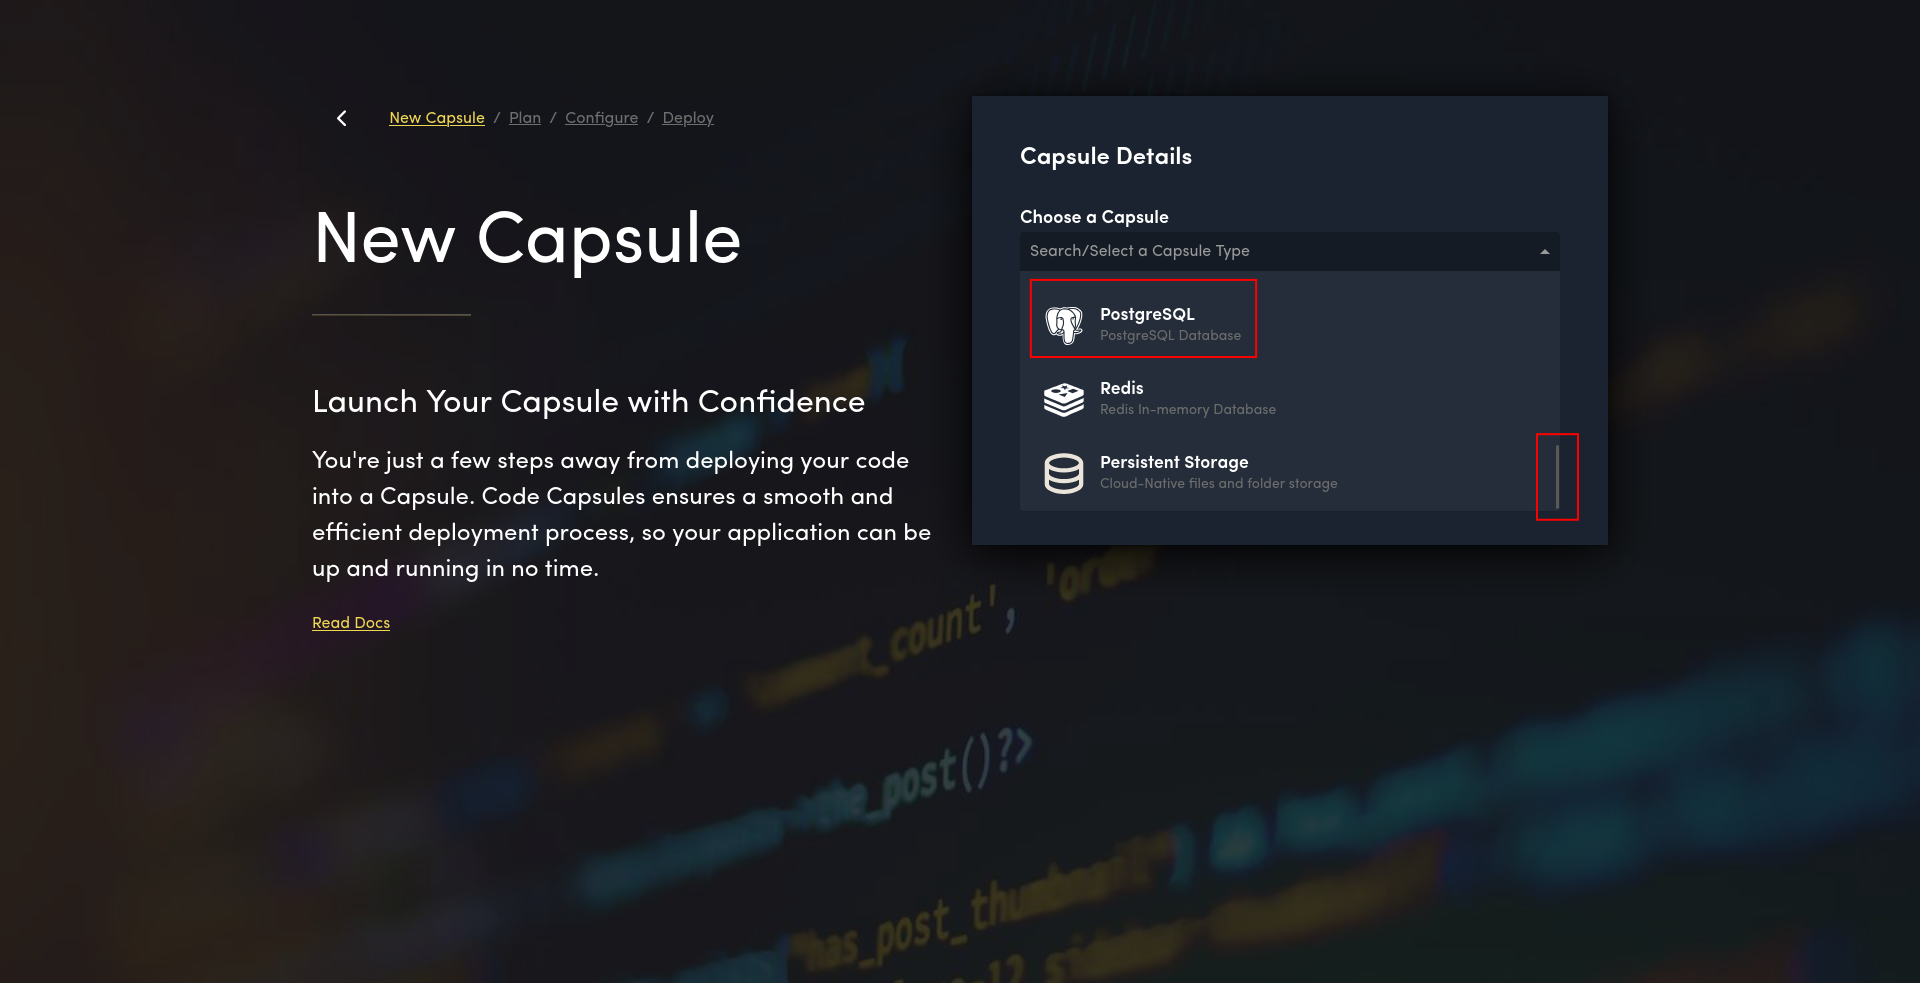
The Database
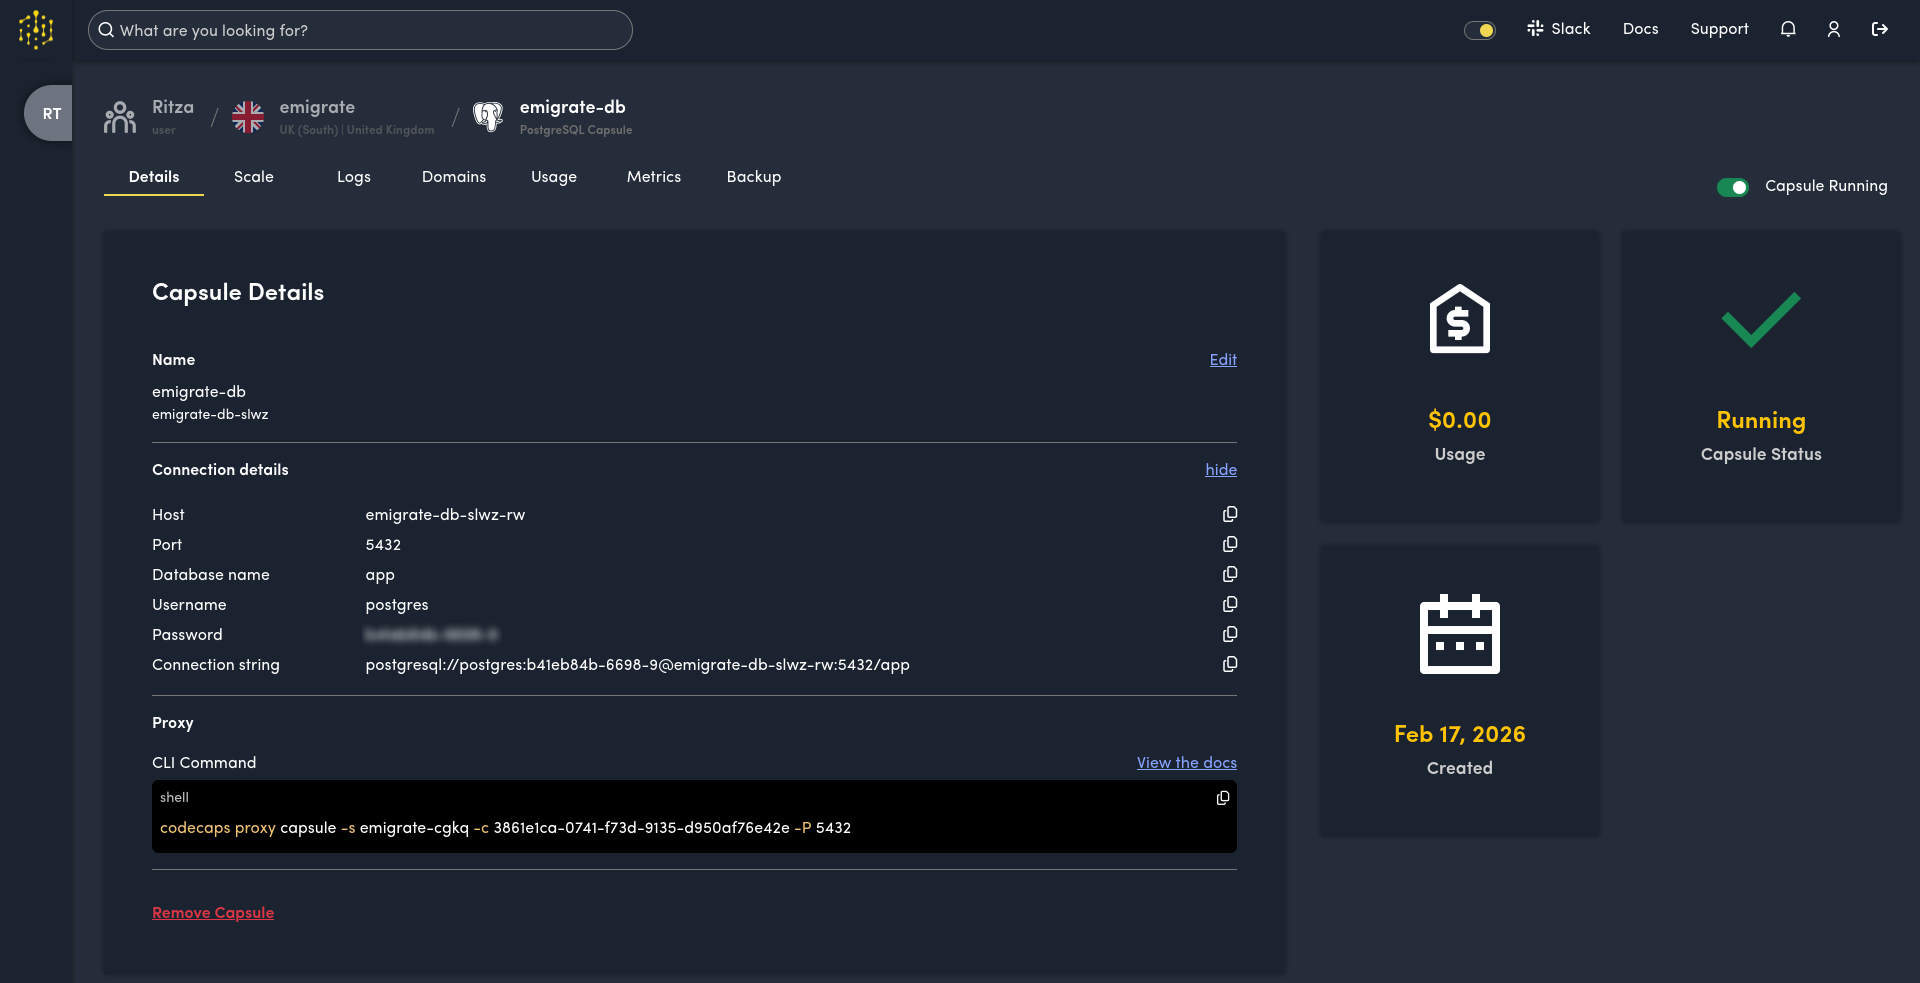
We'll first deploy the component with no dependencies. Unlike in Heroku, databases are their own entities in Code Capsules. We created a PostgreSQL database Capsule. You can see below the User, Space, and Capsule name.
To import data, connect to the database directly using the connection details Code Capsules provides. We need to export a database backup from Heroku and import it to Code Capsules.
The easiest way to export your database from Heroku is to use the CLI to create a database backup, which is saved to AWS S3 as a file you can download.
If your database is only a few MB, however, you can connect to it directly and back it up to your local machine. We did this using the command below to create a backup file called backup.dump.
pg_dump -Fc --no-acl --no-owner "$(curl -s https://api.heroku.com/apps/migrate-backend/config-vars -H "Authorization: Bearer $KEY" -H "Accept: application/vnd.heroku+json; version=3" | jq -r '.DATABASE_URL')" -f backup.dump
Code Capsules keeps databases private rather than exposing a public URL. You connect through a proxy using Code Capsules's CLI. While you don't have to install the CLI permanently on your machine, you do need Node.js installed on your machine (or be able to run Node.js through Docker).
We used the command below to run Node.js in a Docker container (to isolate the CLI dependencies from your local machine), log in to Code Capsules, create a proxy connection to the PostgreSQL database, and restore the database.
To restore your database backup in Code Capsules, you need to change some settings in the command below. You need to use your own email address to log in, and your own connection string details from your database Capsule (starting from the npx command).
# start node in docker
docker run --init -it --rm --platform linux/amd64 --name "cc" -p 5432:5432 -v ".:/app" -w "/app" node:24.12.0-slim bash

# in the docker container terminal:

# install dependencies
apt update && apt install -y libsecret-1-0 dbus dbus-x11 gnome-keyring xsel
dbus-uuidgen > /var/lib/dbus/machine-id

# log in to code capsules
eval $(dbus-launch --sh-syntax) && echo "" | gnome-keyring-daemon --unlock --components=secrets && npx @codecapsules/cli login -e your-email@example.com

# create a proxy connection to the database
npx @codecapsules/cli proxy capsule -s migrate-cgkq -c 3861e1ca-0741-f73d-9135-d950af76e42e -P 5432

# in a new terminal on your host machine, restore the database backup
pg_restore --no-acl --no-owner -d "postgresql://postgres:b41eb84b-6698-9@localhost:5432/app" backup.dump

# check if data exists
psql "postgresql://postgres:b41eb84b-6698-9@localhost:5432/app" -c 'SELECT * FROM "user"'
Copy the connection URL from the Capsule website details rather than using the CLI's copy prompt.

Once your database has restored, you can close the Docker container; you won't need it again unless you want to query the database.
The Backend and Frontend
In Heroku, we used a Node.js Dyno for the frontend instead of a static site. In Code Capsules, static site frontend Capsules are available, so we chose that to host our website. A static site Capsule is simpler for your static web assets, but you'll still need a dynamic frontend Capsule if you're running something like Next.js, which has server-side rendering.
Frontend and backend Capsules look similar. There are only two differences:
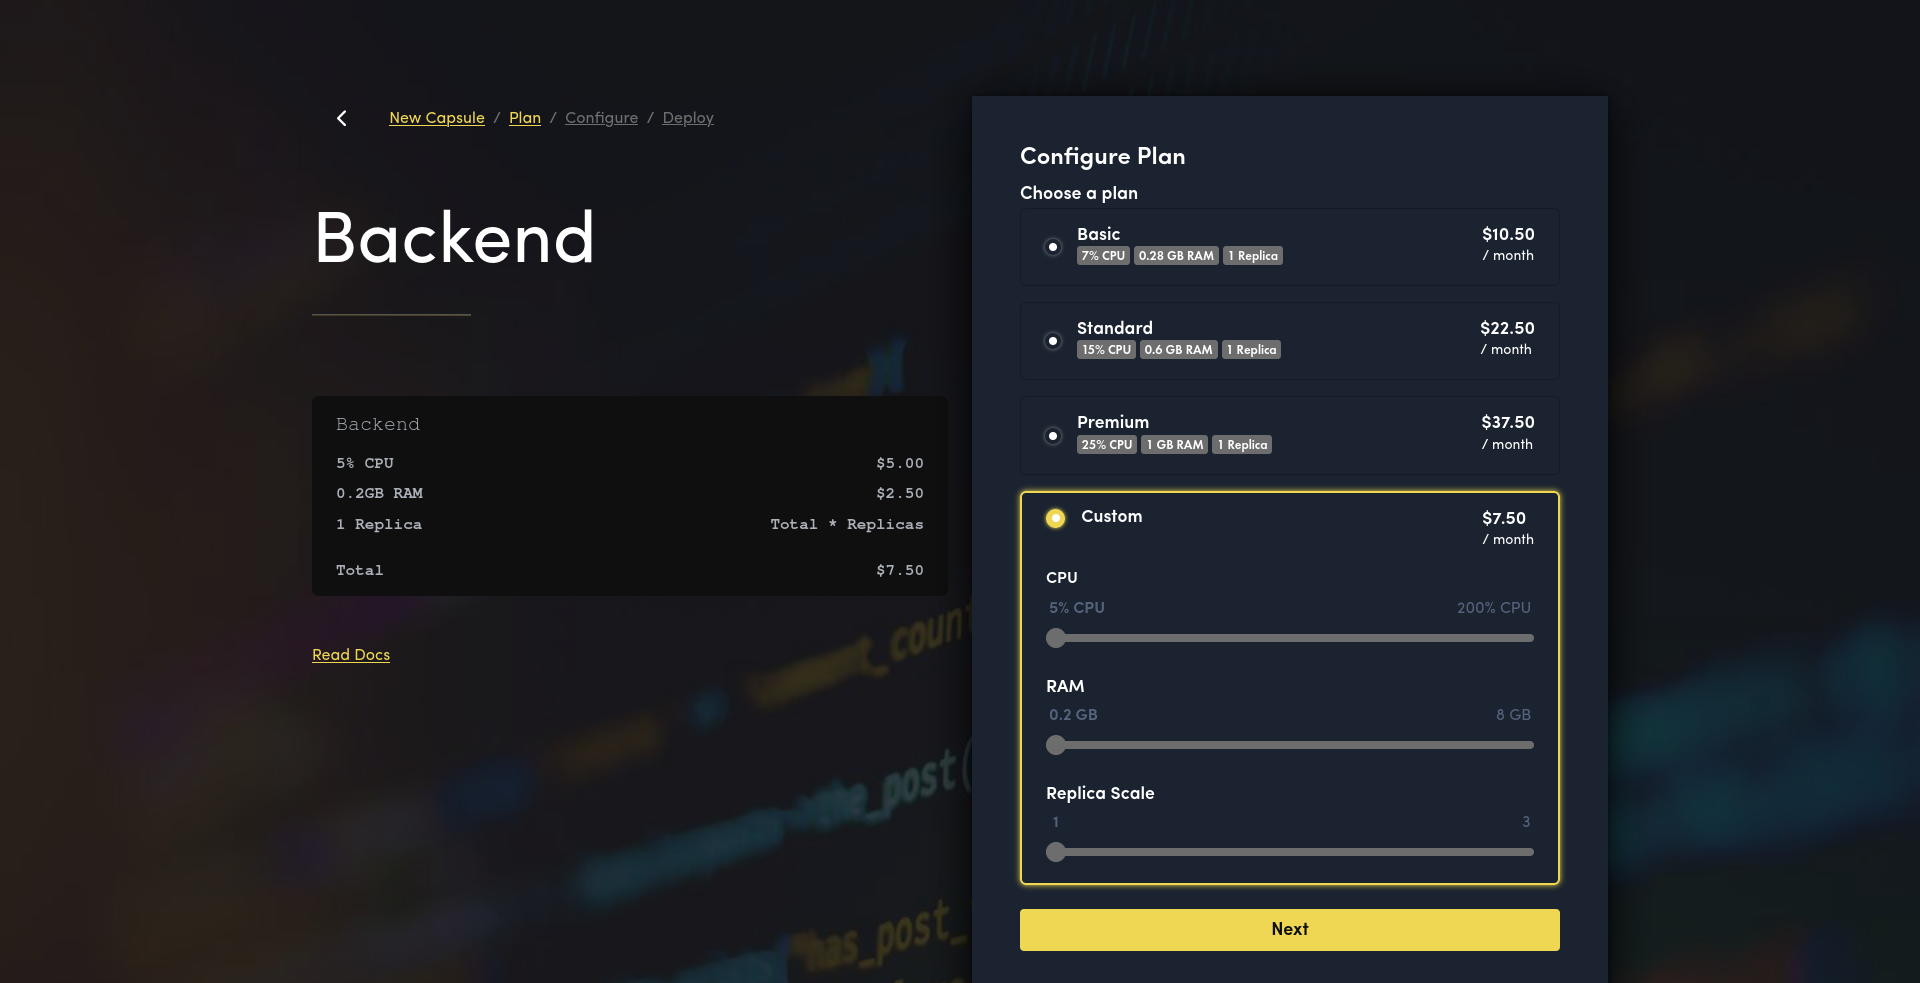
- Pricing: A frontend Capsule's minimum configurable CPU resources (and therefore cost) are lower than a backend Capsule.
- Internal networking: A backend Capsule can access a database Capsule directly, while a frontend Capsule can't, and must talk to the database through a backend web server instead.
While choosing a Capsule size, you can set a custom size cheaper than the smallest standard size. Expand the custom radio-button at the bottom of the form to see more options.
Code Capsules deploys code by pushing to a Git host. Although some Code Capsules tutorials reference GitHub specifically, GitLab and BitBucket are also supported.
Code Capsules also offers European and on-premises infrastructure options — contact support to configure this for your account.
For this guide, we chose GitHub to deploy to Code Capsules.
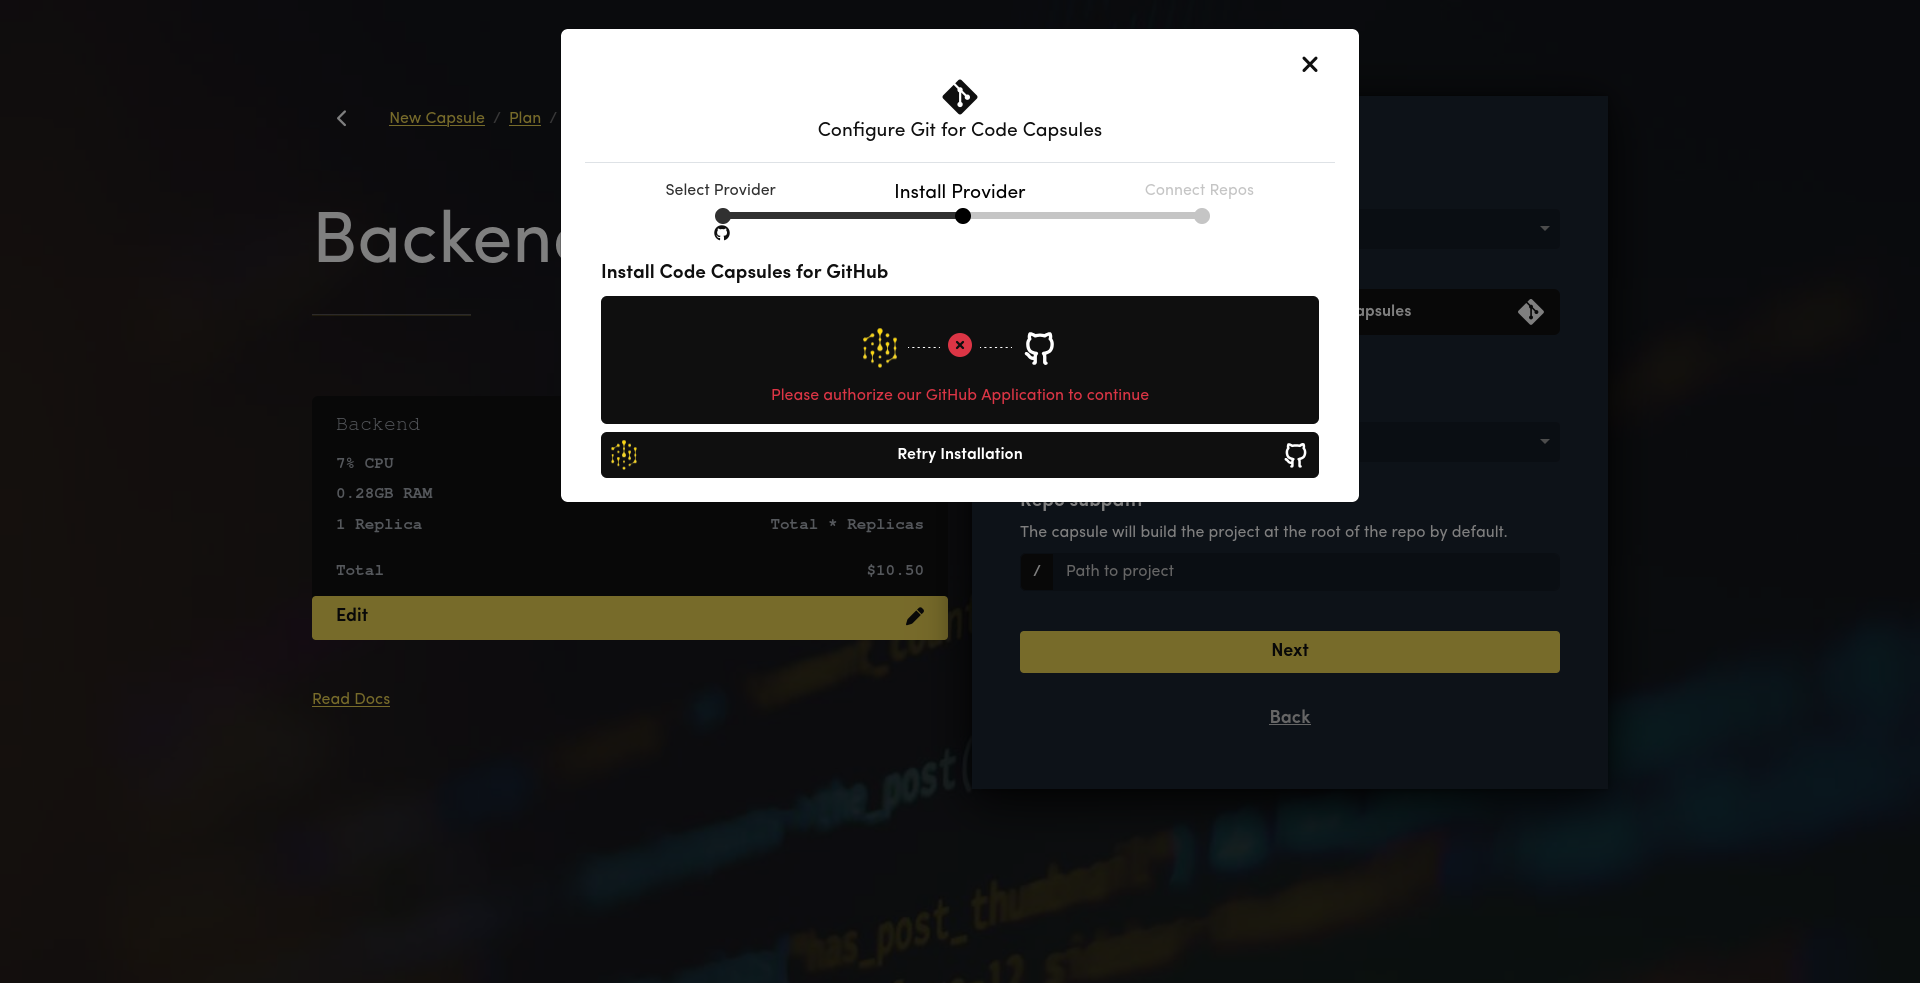
After choosing a frontend static site Capsule type, we connected our GitHub Organization.
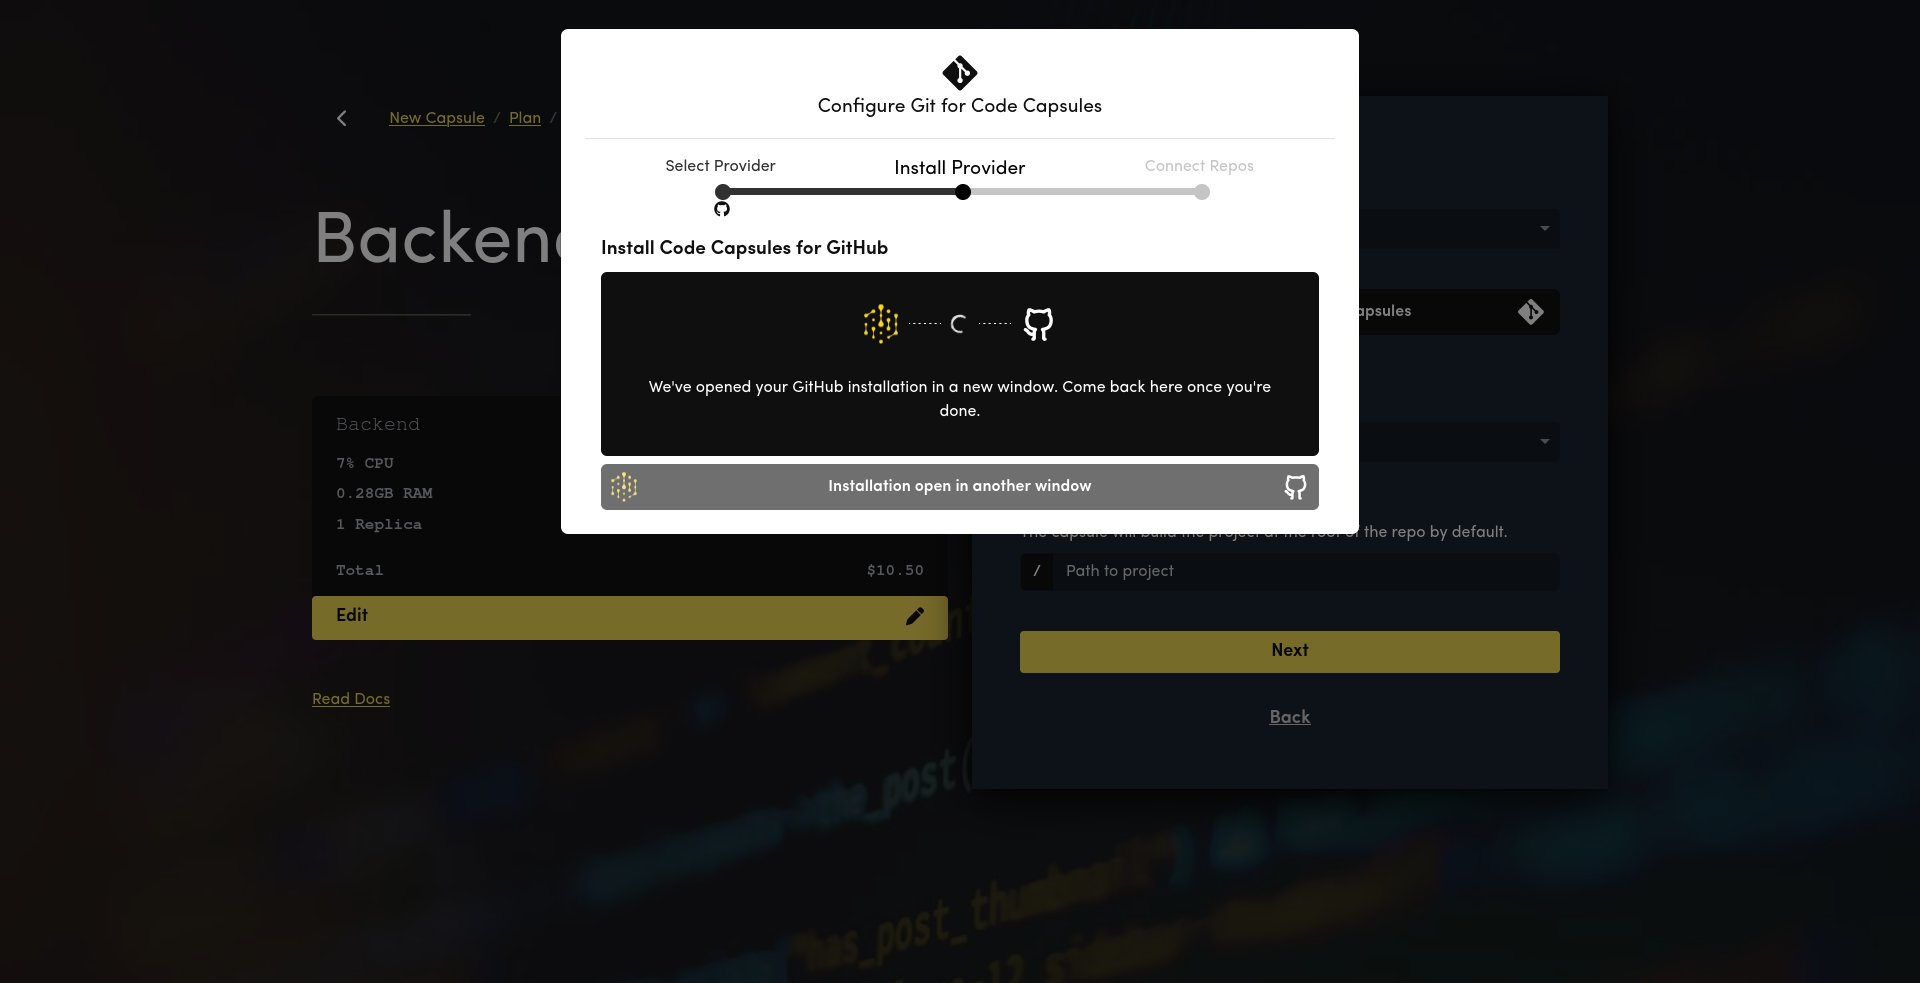
In GitHub, choose which repositories Code Capsules should have access to. We deployed all three components in one repository, but your system probably has multiple repositories you need to enable.
If someone else in your organization has already connected Code Capsules to your Git provider, they can share repository access with you directly within Code Capsules.
Contact Code Capsules support on Slack if you need help with this.
Code Capsules requires linking a repository when creating a Capsule, so ensure your code is ready to deploy before setting up your infrastructure.
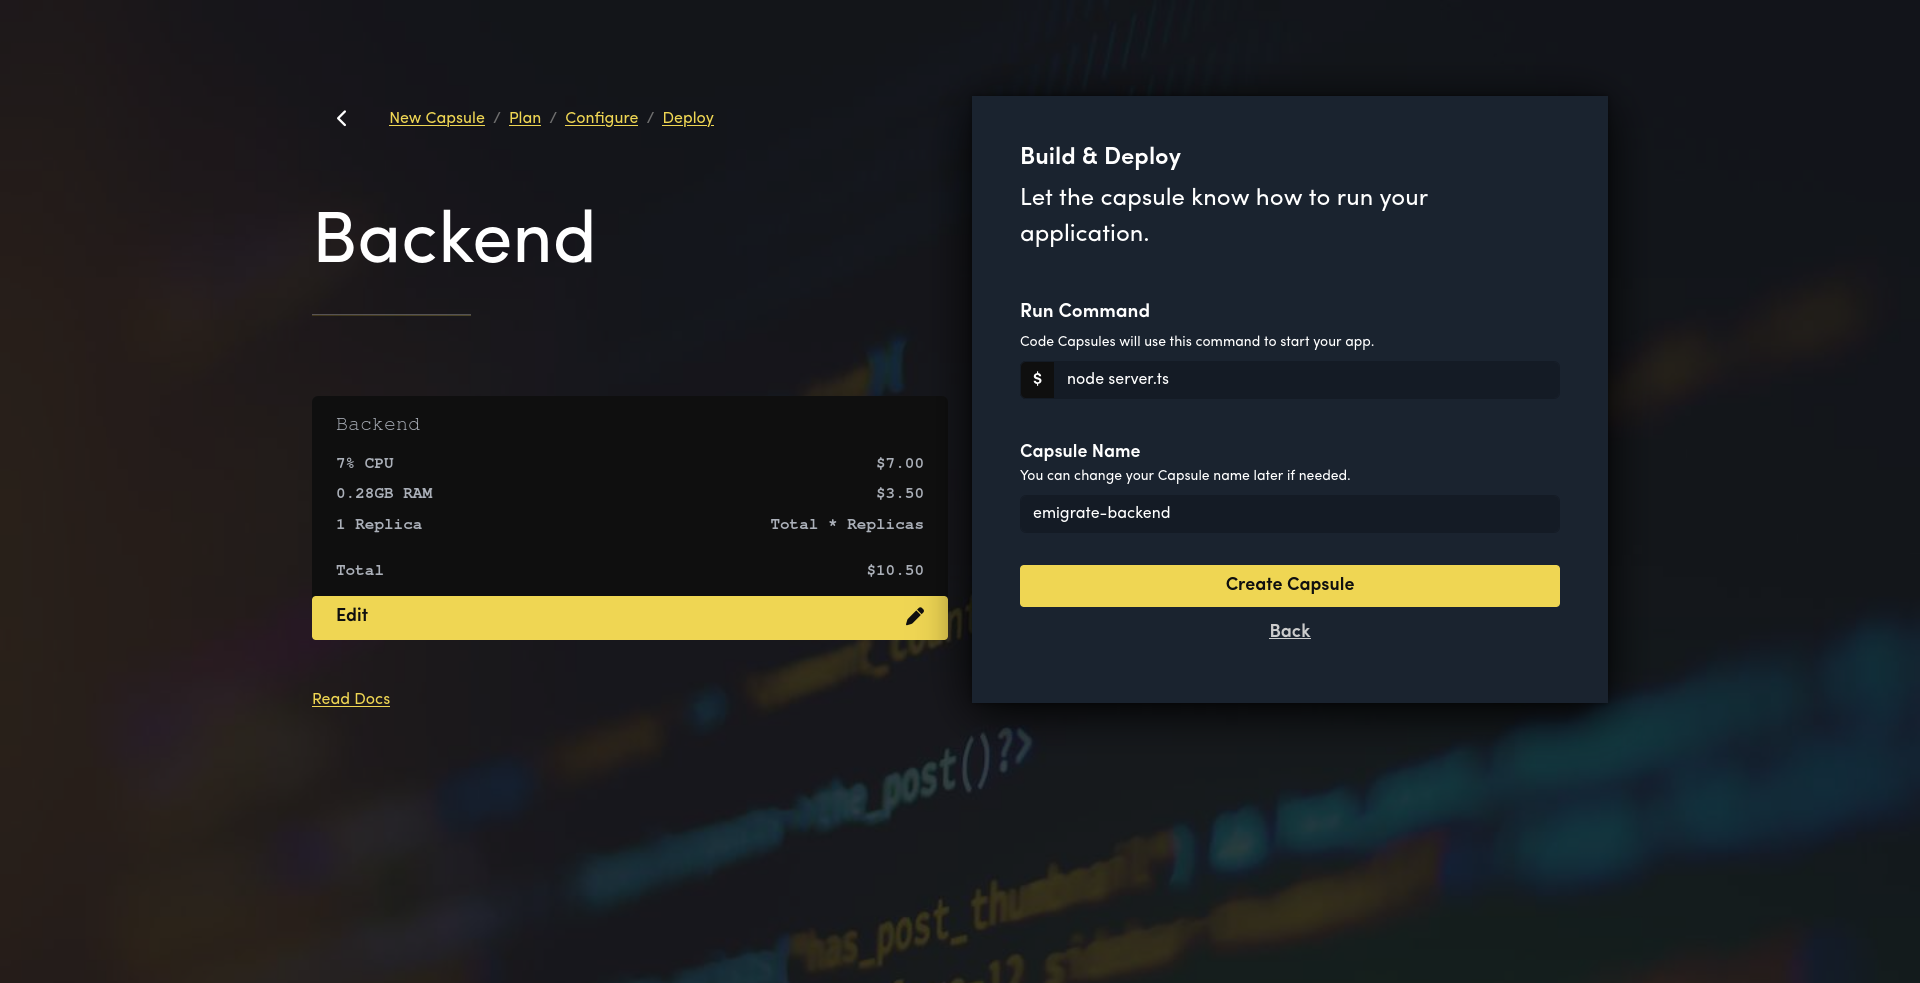
After choosing a repository, you can specify which folder Code Capsules should deploy. Since we had three components in different folders, we chose the /frontend folder. If you have one application per repository, you can just leave Code Capsules to use the / root folder.

Finally, you enter a command to run when starting your Capsule. Like Heroku, you don't have to include dependency installation, like npm install. Code Capsules does that automatically before running your start command. For our static site, no run command is needed.
Nowhere in the process above did we choose which framework to run our code with. Unlike Heroku with its Procfiles, Code Capsules detects your framework automatically.
Deploying the backend code was identical to the frontend, except for using a backend Capsule type, and specifying a run command.
If you browse to the logs you can check if your server is running. Code Capsules lets you specify which Node.js version to use. Our example needed Node.js 24 for native TypeScript support, so we set that in our package.json.
2026-02-18T15:19:50.617
Node.js v20.20.0

2026-02-18T15:18:38.324
TypeError [ERR_UNKNOWN_FILE_EXTENSION]: Unknown file extension ".ts" for /workspace/git-source/backend/server.ts
We needed to update our required Node.js engine at the bottom of our package.json file. Be sure to specify the equivalent for your framework, like Python or PHP.
{
  "name": "heroku-app-backend",
  "version": "1.0.0",
  "type": "module",
  "dependencies": {
    "express": "^4.21.0",
    "pg": "^8.13.0"
  },
  "engines": {"node": "24.x"}
}
After redeploying, the Capsule restarted using the correct Node.js version and our backend worked.
Next — environment variables. Code Capsules is similar to Heroku here. Heroku has config vars and Code Capsules has a Config tab with a list of environment variables.
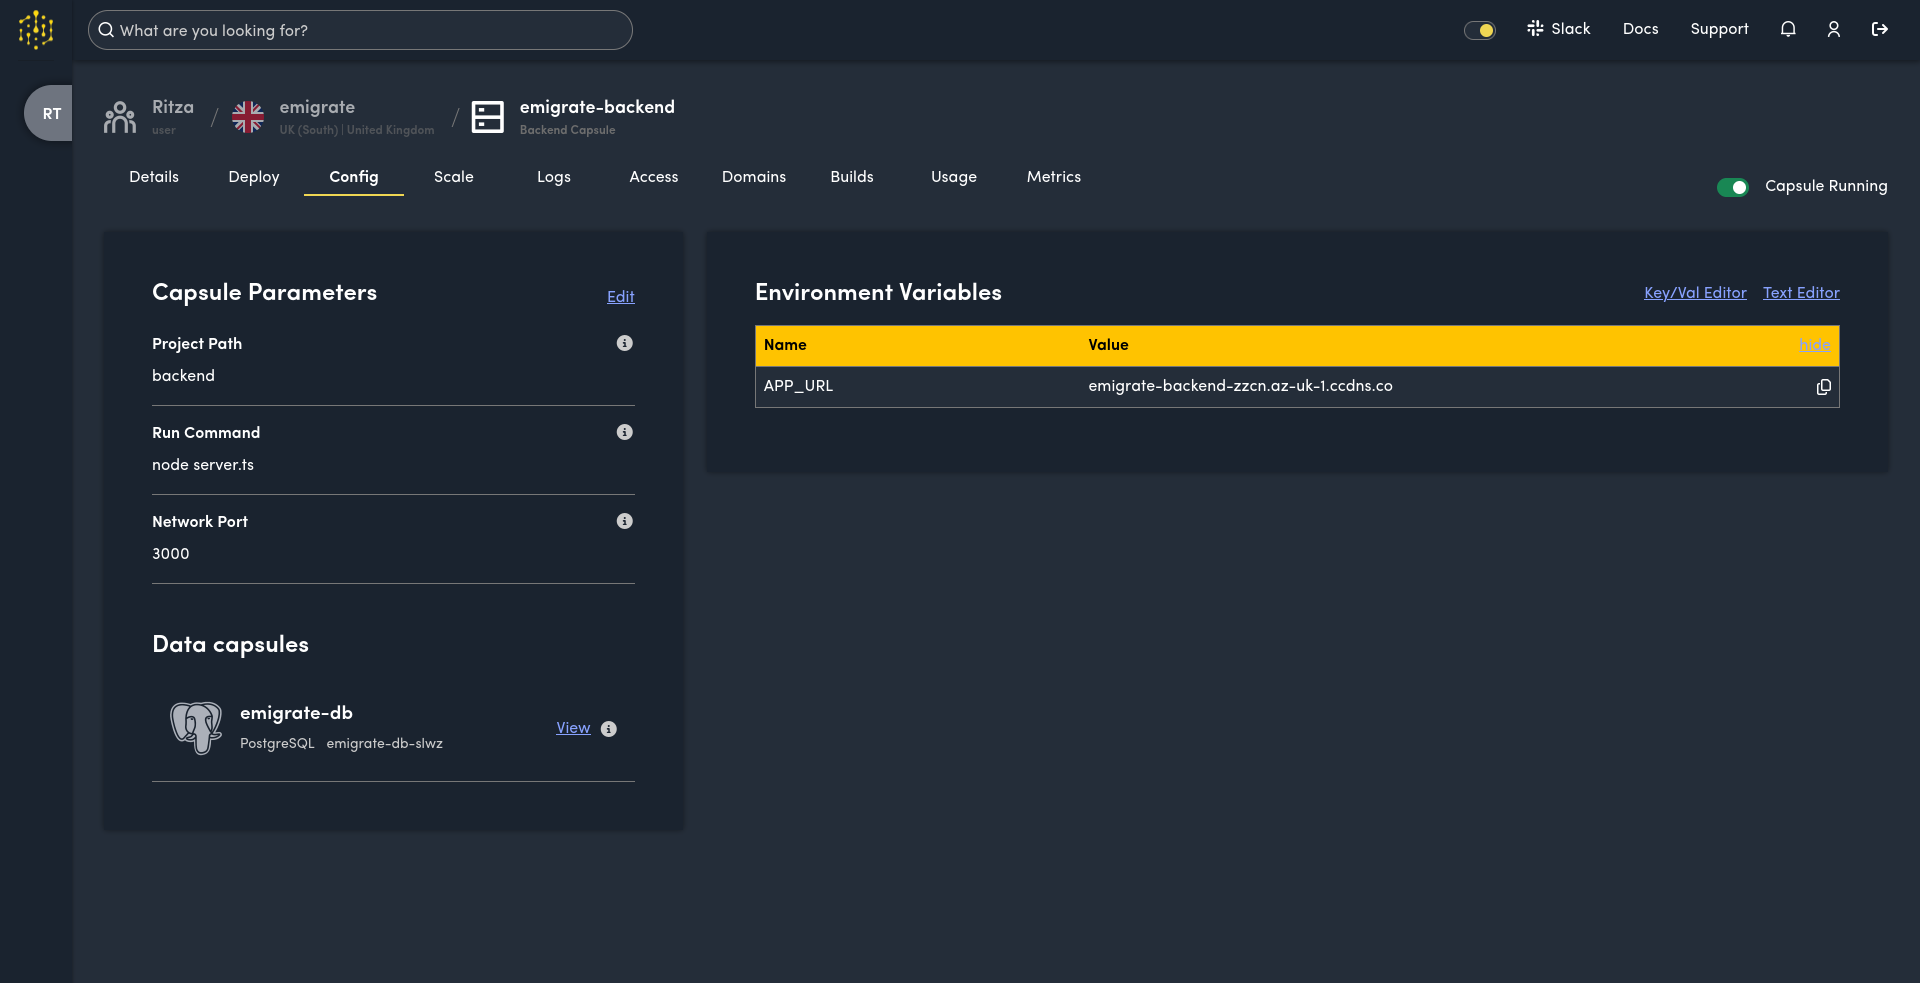
To add a connection from the backend to the database, click your database Capsule at the bottom left. In the details that appear, click the plus icon to add a value as an environment variable to the current Capsule. You can edit the variable name to match whatever you have in your code already, like DATABASE_URL.
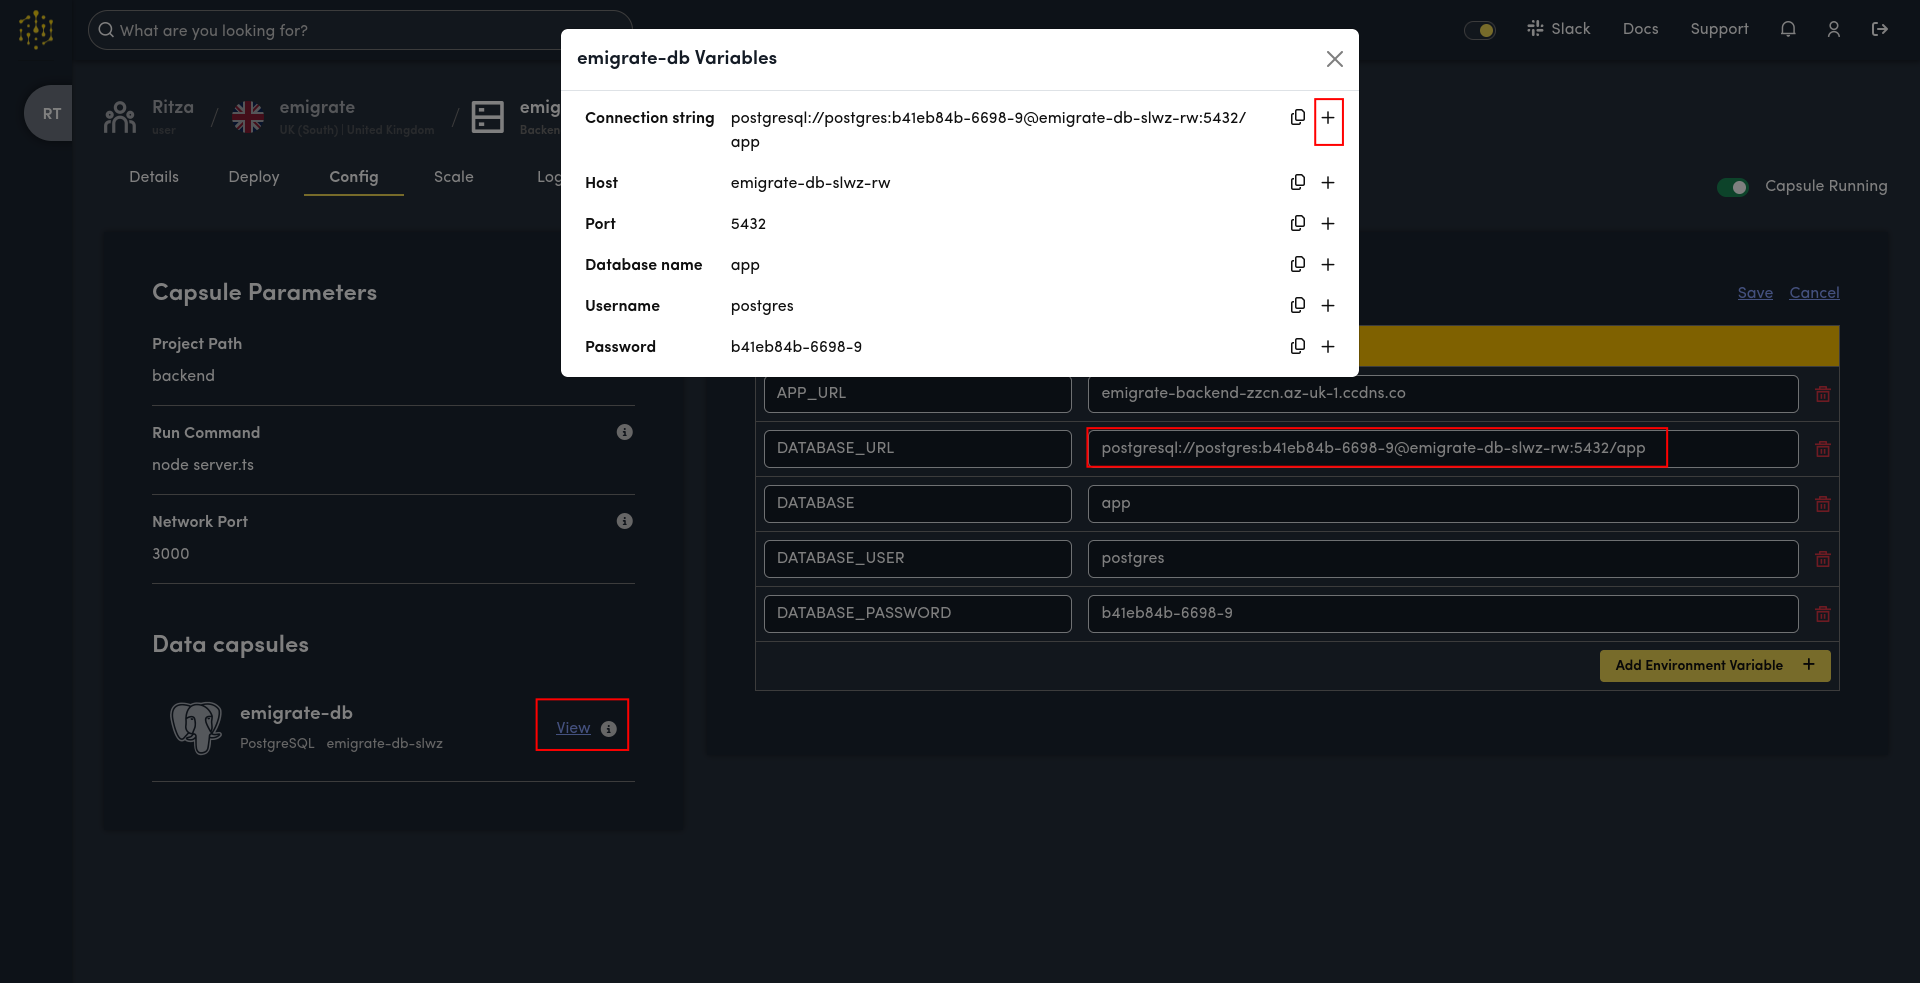
Save your variables at the top right and restart the Capsule.
Like in Heroku, both frontend and backend apps must be deployed before you can get the URLs of them both. You then set both URLs as environment variables, so they can call each other. When setting URLs as environment variables, include the https:// prefix with the URL that Code Capsules provides.
Static sites cannot access environment variables at runtime, so you must include in your build process a way to inject the backend URL into the JavaScript of the website.
The final step was to delete the Heroku Procfiles from our repository, as they are not needed in Code Capsules.
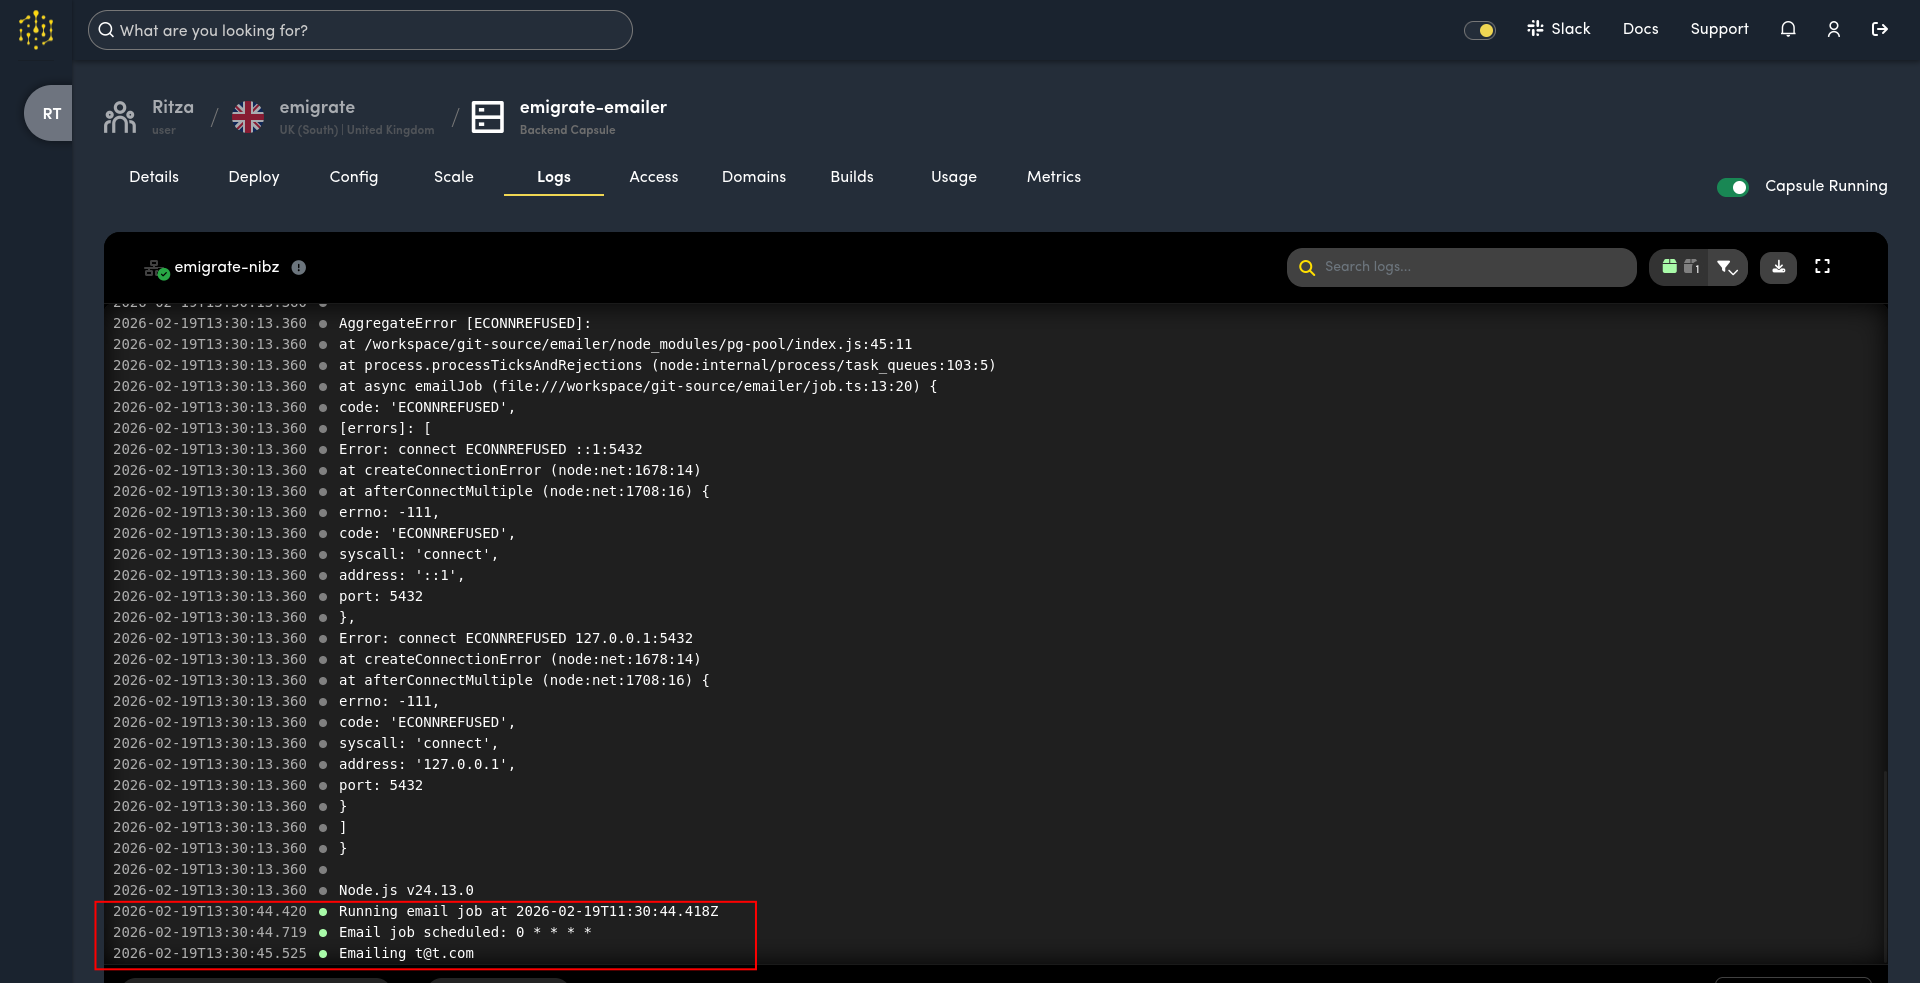
The Cron job
Code Capsules gives you full control over scheduling within your application code, rather than depending on a platform-specific addon. This means your scheduling logic lives in your repository alongside the rest of your code. For our Node.js example, we used node-cron as a dependency.
Our scheduler code is shown below.
async function emailJob() {
  const { rows } = await pool.query(`SELECT username FROM "user"`);
  for (const row of rows) console.log(`Emailing ${row.username}`);
}

cron.schedule("0 * * * *", emailJob);
Here are some considerations for any application-level scheduler (these apply regardless of hosting provider):
- Memory persistence: If your Capsule restarts during a task, the schedule is lost until the process starts again.
- Scaling: If you scale your app to more than one Capsule, the schedule will run on every container simultaneously, duplicating the work. To prevent this, you need a distributed lock (like Redis).
- Missed executions: If the Capsule is down at the exact second a job is scheduled, the scheduler will not run missed jobs once it comes back online.
Another scheduling option is to use an external cron service (like cron-job.org), and have it call an HTTP endpoint you add to your emailer (or backend).
Other Components and Cross-Cutting Concerns in Code Capsules
We've discussed how to move common system components to Code Capsules, but you might have a few more:
- Object storage (file storage): Object storage, like AWS S3, is used for storing binary files like photos, for which databases are not suitable. Code Capsules has a file storage Capsule type. Like the database Capsule, the storage Capsule exposes an environment variable for other backend Capsules to use to access it. The variable is just a file path, like
/mnt/storage, which other Capsules can write to like a normal file system. - SSL/TLS: All Capsules are served over HTTPS automatically with managed TLS certificates. If you use a custom domain, Code Capsules provisions and renews certificates for it automatically once you've created the CNAME record. This is equivalent to Heroku's Automated Certificate Management (ACM).
- Domains: Each Capsule exposes a URL in the Domains tab you can use to create a CNAME record with your DNS provider, so you can use your company's domain name.
- QA environments: Code Capsules uses Git branches for environment management — point a separate Capsule at your QA branch to create a test environment. This keeps your deployment configuration in Git rather than in a platform-specific pipeline tool.
- Deployments: Code Capsules builds and deploys automatically when you push to your linked branch. You can choose between a rolling update (new instance starts before the old one stops) or a re-create strategy (old instance is replaced immediately) in the Capsule settings. Auto-deploy can be turned off if you prefer to trigger builds manually. If you use an external CI tool like GitHub Actions, configure it to run on the same branch so that a failing CI blocks the merge and prevents a broken deploy from reaching Code Capsules.
- CLI automation: Code Capsules provides a web interface for infrastructure management, along with a CLI for tasks like database access.
- Monitoring, logs, and dashboards: Each Capsule provides built-in log streaming, resource usage graphs (CPU, memory, disk), and health status in the web dashboard. Logs are available in real-time and are retained for review. If you need to forward logs to an external service like Datadog, Grafana, or an ELK stack, you can configure your application to send logs via HTTP or syslog to your provider of choice.
- Backups: You can configure a Code Capsules database to automatically backup your database regularly, and you can create manual backups at any time. Backups can be restored with one click.
- Scaling: You can adjust the RAM, CPU, disk space, and number of instances for each Capsule to match your workload.
- Message queues and caches: Components like RabbitMQ and Redis can be deployed in their own backend Capsule, which other Capsules can talk to through HTTP. There is a dedicated Redis Capsule type.
- Custom Docker containers: If your Heroku app uses a framework beyond Code Capsules's built-in options, you can deploy a custom Docker image. To do this, create a Capsule using the Docker type. Point the Capsule to a repository that has your code and a Dockerfile that specifies how to build a Docker image to run your code. Below is an example Dockerfile from the Code Capsules Python Flask tutorial:
Code Capsules builds Docker images from your Dockerfile in your repository. If you have a complex build, you can prebuild an image, publish it to DockerHub, and reference it in a minimal Dockerfile.
# syntax=docker/dockerfile:1

FROM python:3.8-slim-buster

WORKDIR /python-docker

COPY requirements.txt requirements.txt
RUN pip3 install -r requirements.txt

COPY . .

CMD [ "python3", "-m" , "flask", "run", "--host=0.0.0.0"] - Running multiple applications in a Capsule: If you want to run two different services in one Capsule, like a PHP and Ruby server, you need to use a custom Dockerfile that includes both frameworks.
Next Steps
Interested in trying Code Capsules? Create a free account to take a look around, or ask us anything on Slack.